
Yes, you can absolutely thread the bobbin on your sewing machine, and it’s a crucial first step before you start sewing! Getting this right ensures your stitches are even and strong. This guide will walk you through the entire process, from winding your bobbin to inserting it correctly.
Threading the bobbin on a sewing machine might seem tricky at first, but with a little practice, it becomes second nature. This fundamental skill is what allows your sewing machine to create those beautiful stitches. The bobbin holds the thread that forms the underside of your stitches, working in harmony with the top thread to create a balanced and secure seam.
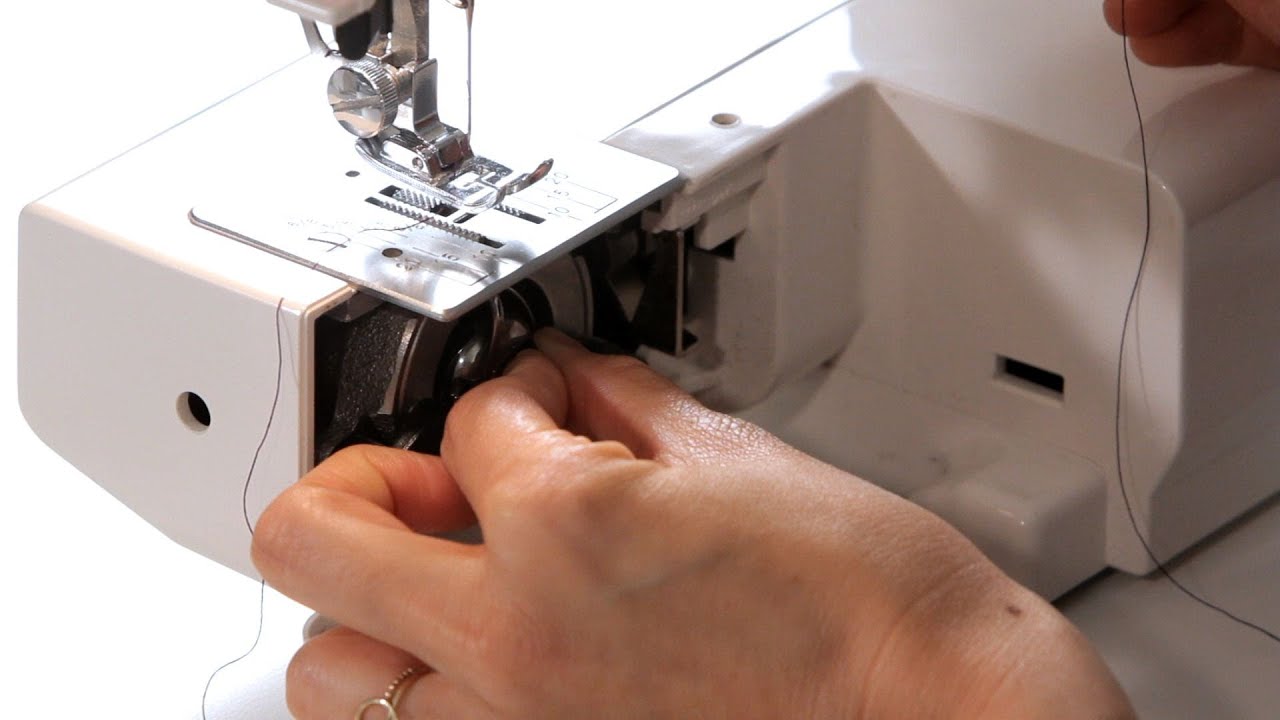
Image Source: i.ytimg.com
Preparing Your Sewing Machine
Before you can even think about threading the bobbin, there are a few essential preparation steps. These ensure a smooth and successful sewing machine bobbin setup.
Gathering Your Supplies
To successfully fill bobbin and get started, you’ll need a few things:
- Sewing Machine: Of course!
- Bobbin: Make sure it’s the correct type for your machine. Most machines use either plastic or metal bobbins. Check your manual if you’re unsure.
- Thread: The same type and weight of thread you plan to use for your project.
- Spool Pin: This is where the main spool of thread goes.
- Bobbin Winder: This is a small spindle, usually on the top or side of your machine, specifically for winding bobbins.
- Scissors or Thread Cutter: To snip the thread.
Checking Your Bobbin Type
It’s vital to use the correct bobbin for your machine. Using the wrong type can lead to skipped stitches, uneven tension, or even damage to your machine.
- Plastic vs. Metal: Most modern machines use plastic bobbins, which are lightweight and less prone to rust. Older machines might use metal bobbins.
- Size and Shape: Bobbins vary in size and the number of notches they have. Compare your spare bobbins to the one currently in your machine or check your sewing machine manual.
Selecting the Right Thread
The thread you use for your bobbin should ideally match the thread you’re using in the needle. This ensures even tension and a balanced stitch.
- Weight: If you’re sewing with a heavy fabric, you might use a slightly heavier thread on the bobbin. For lighter fabrics, stick to a general-purpose thread.
- Fiber Content: For best results, try to match the fiber content (e.g., cotton with cotton, polyester with polyester).
Winding the Bobbin: Step-by-Step
Winding the spool onto the bobbin is the first major step in sewing bobbin setup. This process is often referred to as sewing machine bobbin winding.
Locating the Bobbin Winder
Every sewing machine has a bobbin winder. It’s usually a small spindle that pops up or swings out. You’ll often find it near the spool pin.
- Spool Pin: The larger pin where your main thread spool sits.
- Bobbin Winder Spindle: The smaller, often metal or plastic spindle designed to hold the bobbin.
Placing the Bobbin on the Winder
This is a simple but important step. Make sure the bobbin is seated correctly on the winder spindle.
- Slide the Bobbin: Gently slide the bobbin onto the bobbin winder spindle. It should fit snugly.
- Secure the Bobbin: Some machines have a small notch or a clip to secure the bobbin in place. Others rely on a snug fit.
Threading the Bobbin Winder
This is where you guide the thread from the main spool to the bobbin.
- Guide Thread from Spool: Take the end of your thread from the main spool.
- Follow the Thread Path: Your sewing machine will have a specific path for bobbin winding. This usually involves going around a small guide or tension disc. Refer to your machine’s diagram if you’re unsure.
- Insert Thread into Bobbin Hole: Find the small hole in the side of your bobbin.
- Pull Thread Through: Thread the end of the thread through this hole from the inside of the bobbin outwards.
- Pull Through a Little: Pull about 3-4 inches of thread through the bobbin hole. This tail will be used to start winding.
Starting the Winding Process
Now it’s time to actually wind bobbin.
- Hold the Thread Tail: Hold onto the tail of the thread you just pulled through the bobbin. This prevents it from getting tangled.
- Engage the Bobbin Winder: Most machines have a lever or mechanism that engages the bobbin winder when it’s ready. Push the winder spindle towards the engaging point.
- Stitch Regulator (Optional but Recommended): Some machines have a stitch regulator. Set it to a straight stitch, usually a medium length (like 2.5).
- Engage the Foot Pedal: Gently press the foot pedal. Hold that thread tail firmly for the first few wraps.
- Initial Wraps: As the bobbin starts to wind, the thread will wrap around the tail. Once you have a few wraps, snip the excess tail close to the bobbin, leaving only a small piece. This prevents the tail from unraveling later.
- Continue Winding: Continue pressing the foot pedal. The thread should wind evenly onto the bobbin.
Stopping the Winding
Most machines have an automatic stop mechanism.
- Automatic Stop: When the bobbin is full, the bobbin winder will usually disengage automatically. You’ll feel the resistance lessen.
- Manual Stop: If your machine doesn’t have an automatic stop, or you want to stop early, simply lift your foot off the pedal.
Finishing and Cutting the Thread
Once the bobbin is wound, you need to cut the thread.
- Disengage the Winder: Move the bobbin winder spindle back to its resting position.
- Remove the Bobbin: Gently slide the wound bobbin off the winder spindle.
- Cut the Thread: Use scissors or your machine’s thread cutter to snip the thread coming from the main spool.
Table: Bobbin Winding Tips
| Tip | Benefit |
|---|---|
| Use matching thread to your top thread. | Creates balanced stitches and even tension. |
| Wind bobbins evenly. | Prevents uneven stitch formation. |
| Don’t overfill the bobbin. | Can cause the thread to snag or break. |
| Snip the thread tail after a few wraps. | Prevents the tail from unraveling. |
| Use the correct bobbin for your machine. | Ensures proper fit and function. |
| Keep a supply of wound bobbins. | Saves time during projects. |
Inserting the Bobbin: Completing the Setup
Now that you have a wound bobbin, it’s time to insert bobbin into the machine. This is the final piece of the sewing bobbin setup.
Locating the Bobbin Area
The bobbin area is where the magic happens. It’s usually found under the needle plate.
- Needle Plate: The metal plate directly beneath the needle.
- Bobbin Case Area: The compartment beneath the needle plate where the bobbin is housed.
Types of Bobbin Cases
There are two main types of bobbin systems in sewing machines:
- Top Loading (Drop-in Bobbin): This is the more common and user-friendly system. The bobbin is inserted directly into a clear plastic cover.
- Front Loading (Removable Bobbin Case): This system involves removing a small bobbin case from the machine.
Top Loading Bobbin System
This system is designed for ease of use.
- Remove the Needle Plate Cover: If your machine has one, lift off the plastic cover over the bobbin area.
- Identify the Bobbin Direction: Look for arrows or markings on the bobbin cover and the bobbin itself. These indicate the correct direction the bobbin should spin.
- Place the Bobbin: Drop the bobbin into the bobbin case. Ensure the thread is coming off the bobbin in the direction indicated by the arrows.
- Thread the Bobbin Case: Find the small slit or notch in the bobbin case.
- Guide the Thread: Pull the thread from the bobbin through this slit.
- Pull Thread Under the Tension Spring: There’s a small tension spring that the thread needs to go under. You should feel slight resistance.
- Leave a Tail: Leave about 4-6 inches of thread tail hanging out.
Front Loading Bobbin System (Removable Bobbin Case)
This system requires a bit more manipulation.
- Remove the Needle Plate: You may need to slide or lift off the needle plate to access the bobbin case.
- Remove the Bobbin Case: Gently pull out the small bobbin case. It usually has a little lever or latch to help you grip it.
- Insert Bobbin into Case:
- Check Direction: Look for an arrow on the bobbin case that indicates the direction the thread should be pulled.
- Place Bobbin: Place the wound bobbin into the bobbin case.
- Thread the Case: Find the small slit in the side of the bobbin case. Pull the thread through this slit, ensuring it goes under the tension spring. Leave a tail of about 4-6 inches.
- Reinsert the Bobbin Case:
- Align: Align the bobbin case with the opening in the machine. There’s usually a small metal prong or notch on the case that needs to fit into a corresponding slot in the machine.
- Slide In: Gently slide the bobbin case back into place. You might hear a soft click when it’s properly seated.
- Replace Needle Plate: Slide or place the needle plate back on.
Bringing Up the Bottom Thread
This is the crucial step that connects the top and bottom thread.
- Hold the Top Thread: With one hand, hold the tail of the top thread.
- Lower the Presser Foot: Make sure the presser foot is down. This engages the tension mechanism.
- Turn the Handwheel: Slowly turn the handwheel towards you (counter-clockwise). This will lower the needle to pick up the bobbin thread.
- The Loop: As the needle goes down and then starts to come back up, it will catch the bobbin thread and create a small loop.
- Pull the Loop: When the needle is at its highest point, use your fingers or tweezers to catch that loop of bobbin thread.
- Pull Thread Through: Gently pull the loop of bobbin thread forward until you have a decent length of thread hanging out from under the presser foot.
- Secure the Tails: You should now have both the top thread tail and the bobbin thread tail hanging out from under the presser foot. Hold both tails together.
Setting Up for First Stitch
With both threads in place, you’re almost ready to sew.
- Slide the Bobbin Cover: If you have a top-loading system, slide the bobbin cover back into place.
- Test Stitch: Before starting your project, it’s a good idea to do a test stitch on a scrap piece of fabric. This allows you to check your tension and stitch quality.
- Position Fabric: Place your fabric under the presser foot and lower the presser foot.
- Start Sewing: Gently press the foot pedal to begin sewing. The machine will automatically start using both the top and bottom threads.
Troubleshooting Common Bobbin Issues
Even with careful attention, you might encounter a few hiccups. Here are some common problems and how to fix them.
Bobbin Not Winding Properly
- Problem: Thread is not winding evenly onto the bobbin, or it’s stopping mid-wind.
- Possible Causes:
- Bobbin not seated correctly on the winder spindle.
- Thread not threaded through the bobbin hole properly.
- Thread tangled on the spool or at the winder.
- The bobbin is the wrong type or size.
- Solutions:
- Remove the bobbin and re-seat it securely.
- Ensure the thread tail is pulled through the bobbin hole and held during the initial wraps.
- Check for any knots or tangles in the thread.
- Confirm you are using the correct bobbin for your machine.
Thread Breaking During Winding
- Problem: The thread breaks while winding the bobbin.
- Possible Causes:
- Sharp edges on the bobbin or winder spindle.
- Thread snagging on the spool.
- Winding too fast.
- Solutions:
- Inspect the bobbin and winder for any burrs or rough spots.
- Ensure the thread is feeding smoothly from the spool.
- Try winding at a slower speed.
Bobbin Thread Not Coming Up
- Problem: You’re turning the handwheel, but the bobbin thread loop isn’t appearing.
- Possible Causes:
- The presser foot is up.
- The bobbin is inserted incorrectly (wrong direction, not under the tension spring).
- The bobbin case is not properly seated.
- The top thread is tangled or not threaded correctly.
- Solutions:
- Ensure the presser foot is down.
- Double-check the bobbin insertion, especially the direction and the tension spring.
- Make sure the bobbin case is firmly in place.
- Re-thread the top thread, ensuring it follows the correct path and is seated in the tension discs.
Uneven Stitches or Skipped Stitches
- Problem: Your stitches look messy, or some are missing entirely.
- Possible Causes:
- Incorrect bobbin tension (too tight or too loose).
- Bobbin wound unevenly.
- Wrong needle for the fabric or thread.
- Lint buildup in the bobbin area or tension discs.
- Solutions:
- Check and adjust your bobbin tension (refer to your manual).
- Ensure your bobbin is wound smoothly and evenly.
- Try a new, sharp needle appropriate for your fabric.
- Clean the bobbin area and tension discs with a small brush.
Table: Common Bobbin Problems and Solutions
| Problem | Potential Cause | Solution |
|---|---|---|
| Bobbin not winding evenly | Bobbin not seated correctly, thread not threaded through hole | Re-seat bobbin, ensure thread tail is pulled through hole. |
| Thread breaking during winding | Sharp edges, snagging thread, winding too fast | Inspect bobbin/winder, ensure smooth thread feed, reduce winding speed. |
| Bobbin thread not coming up | Presser foot up, incorrect bobbin insertion, bobbin case not seated | Lower presser foot, re-insert bobbin correctly (direction, tension spring), ensure bobbin case is secure. |
| Uneven stitches | Incorrect bobbin tension, uneven bobbin winding | Adjust bobbin tension, re-wind bobbin evenly. |
| Skipped stitches | Lint buildup, wrong needle, incorrect tension | Clean bobbin area, use appropriate needle, check thread tension. |
| Thread tangling or bunching underneath | Top thread tension too loose, bobbin not threaded correctly, lint buildup | Adjust top thread tension, re-thread bobbin correctly, clean bobbin area. |
Frequently Asked Questions (FAQ)
What is the purpose of a sewing machine bobbin?
The bobbin holds the lower thread that is used to create the stitches from the underside of the fabric. It works in conjunction with the upper thread to form a strong and balanced stitch.
Can I use any thread to wind a bobbin?
Ideally, you should use thread that matches the weight and fiber content of your upper thread. While you can use other threads, it may affect the stitch quality and tension.
How do I know which way to wind the bobbin?
Most machines have arrows or markings that indicate the correct direction. The thread usually needs to come off the bobbin in a specific direction when it’s in the machine.
What if my bobbin winder stops working?
Check if the bobbin is properly seated on the spindle and if the thread is caught anywhere. Also, ensure the bobbin winder mechanism itself is engaged correctly. Refer to your sewing machine manual for specific troubleshooting steps.
How much thread should I leave hanging after winding?
Leave about 4-6 inches of thread tail hanging from the bobbin before you begin sewing. This ensures there’s enough thread to catch the needle and form the initial stitches.
My bobbin thread is looping on the top of the fabric. What should I do?
This usually indicates that your top thread tension is too loose, or your bobbin thread is too tight. Try adjusting your machine’s tension settings. Also, ensure the bobbin is inserted correctly and the thread is going under the tension spring.
How often should I clean the bobbin area?
It’s a good practice to clean the bobbin area every time you change the bobbin or at least every few sewing sessions. Lint and dust can accumulate and affect your machine’s performance.
By following these detailed steps, you’ll master the art of threading the bobbin on your sewing machine. This essential skill will pave the way for countless successful sewing projects! Happy sewing!