
Image Source: mindymakes.com
How to Thread The Brother Sewing Machine: Step-by-Step
Can you thread a Brother sewing machine easily? Yes, with these simple steps, threading your Brother sewing machine will become a breeze! This guide will walk you through the entire process, from winding the bobbin to setting the upper thread, ensuring smooth and successful sewing every time.
Getting Started: Before You Thread
Before you even touch a spool of thread, it’s important to prepare your Brother sewing machine. Making sure everything is in order will prevent frustration later on.
Checking Your Machine’s Components
- Needle: Is the needle inserted correctly? It should be all the way up and the flat side facing the back. A bent or dull needle can cause skipped stitches and thread breakage.
- Presser Foot: Is the presser foot lowered? Most Brother sewing machines will not allow you to sew or thread properly if the presser foot is up.
- Bobbin: Do you have a bobbin wound and ready to go? We’ll cover this in detail next.
- Spool Pin: Is the spool pin in its correct position? Make sure it’s either pulled up or inserted as your specific Brother sewing machine model requires.
Essential Items You’ll Need
- Thread Spool: Use good quality thread. Cheap thread can break easily.
- Bobbin: Make sure you’re using the correct type of bobbin for your Brother sewing machine. Check your Brother sewing machine manual if you’re unsure.
- Sewing Machine Needles: Have a few spares on hand in case one breaks.
Step 1: Bobbin Winding – The Foundation of Sewing
Proper bobbin winding is crucial for a balanced stitch. An unevenly wound bobbin can lead to thread tension issues. Let’s get this done first.
Preparing for Bobbin Winding
- Place the Thread Spool: Put your spool of thread on the spool pin. Some Brother sewing machines have a horizontal spool pin, while others have a vertical one. Consult your Brother sewing machine manual for your specific model.
- Thread the Bobbin Winder: Guide the thread from the spool through the bobbin winder thread guide. This is usually a small metal loop or hole near the spool pin.
- Insert the Bobbin: Place an empty bobbin onto the bobbin winder spindle. Push it to the side to engage the winder mechanism. You’ll often feel a click or see it move into place.
The Bobbin Winding Process
The exact steps for Brother sewing machine bobbin winding can vary slightly between models, but the general principle is the same.
- Start the Winding: Hold the end of the thread with your finger. Gently press the foot pedal to start the bobbin winder. You want to wind the thread onto the bobbin evenly.
- Guide the Thread: As the bobbin starts to wind, guide the thread a few times around the bobbin. Then, pass the thread through the small slit or hole on the bobbin itself to secure it.
- Continue Winding: Continue winding until the bobbin is nearly full. Avoid overfilling, as this can cause problems with the stitch.
- Cut the Thread: Once the bobbin is full, stop the machine and cut the thread close to the bobbin.
- Remove the Bobbin: Push the bobbin winder spindle away from the winder to disengage it. Remove the wound bobbin.
Table 1: Bobbin Winding Tips
| Tip | Why it Matters |
|---|---|
| Use the correct bobbin type | Prevents damage and ensures proper fit. |
| Wind evenly | Crucial for consistent thread tension. |
| Don’t overfill the bobbin | Prevents thread snagging and uneven stitches. |
| Use good quality thread | Reduces breakage and improves stitch quality. |
Step 2: Inserting the Bobbin – The Lower Thread
Now that your bobbin is wound, it’s time to place it into the bobbin case. This is where the Brother sewing machine lower thread originates.
Locating the Bobbin Case
Most Brother sewing machines have a front-loading bobbin case or a top-loading drop-in bobbin system.
- Front-Loading Bobbin Case: You’ll typically lift a small cover plate (often called a needle plate or throat plate) to access the bobbin case. Remove the bobbin case.
- Top-Loading Drop-in Bobbin: You’ll simply remove the bobbin cover and the bobbin cover case.
Inserting the Bobbin
- Position the Bobbin: Place the wound bobbin into the bobbin case. Make sure the thread is unwinding from the bobbin in the correct direction. For most Brother sewing machines, the thread should be coming off the front of the bobbin and unwinding counter-clockwise when viewed from the top.
- Guide the Thread: Pull the thread from the bobbin and guide it through the small slot or slit in the bobbin case. This holds the thread in place. You’ll usually see a small notch or hole to guide it through.
- Replace the Bobbin Case: Carefully place the bobbin case back into its housing. Ensure it’s seated correctly. For drop-in bobbins, simply place the wound bobbin into the case with the thread unwinding in the correct direction.
Important Note: Always refer to your Brother sewing machine manual for the specific orientation of the bobbin and thread for your model.
Step 3: Brother Sewing Machine Needle Threading – The Upper Thread
This is a critical step in Brother sewing machine threading. Proper needle threading ensures a clean stitch.
Preparing to Thread the Needle
- Raise the Presser Foot: Make sure the presser foot is in the up position. This releases the tension discs, allowing the thread to pass through smoothly.
- Position the Thread Spool: Place your spool of thread on the spool pin.
- Follow the Thread Path: This is where your Brother sewing machine manual is invaluable. Each machine has a specific thread path that the upper thread must follow. This path guides the thread through tension discs, various thread guides, and the needle.
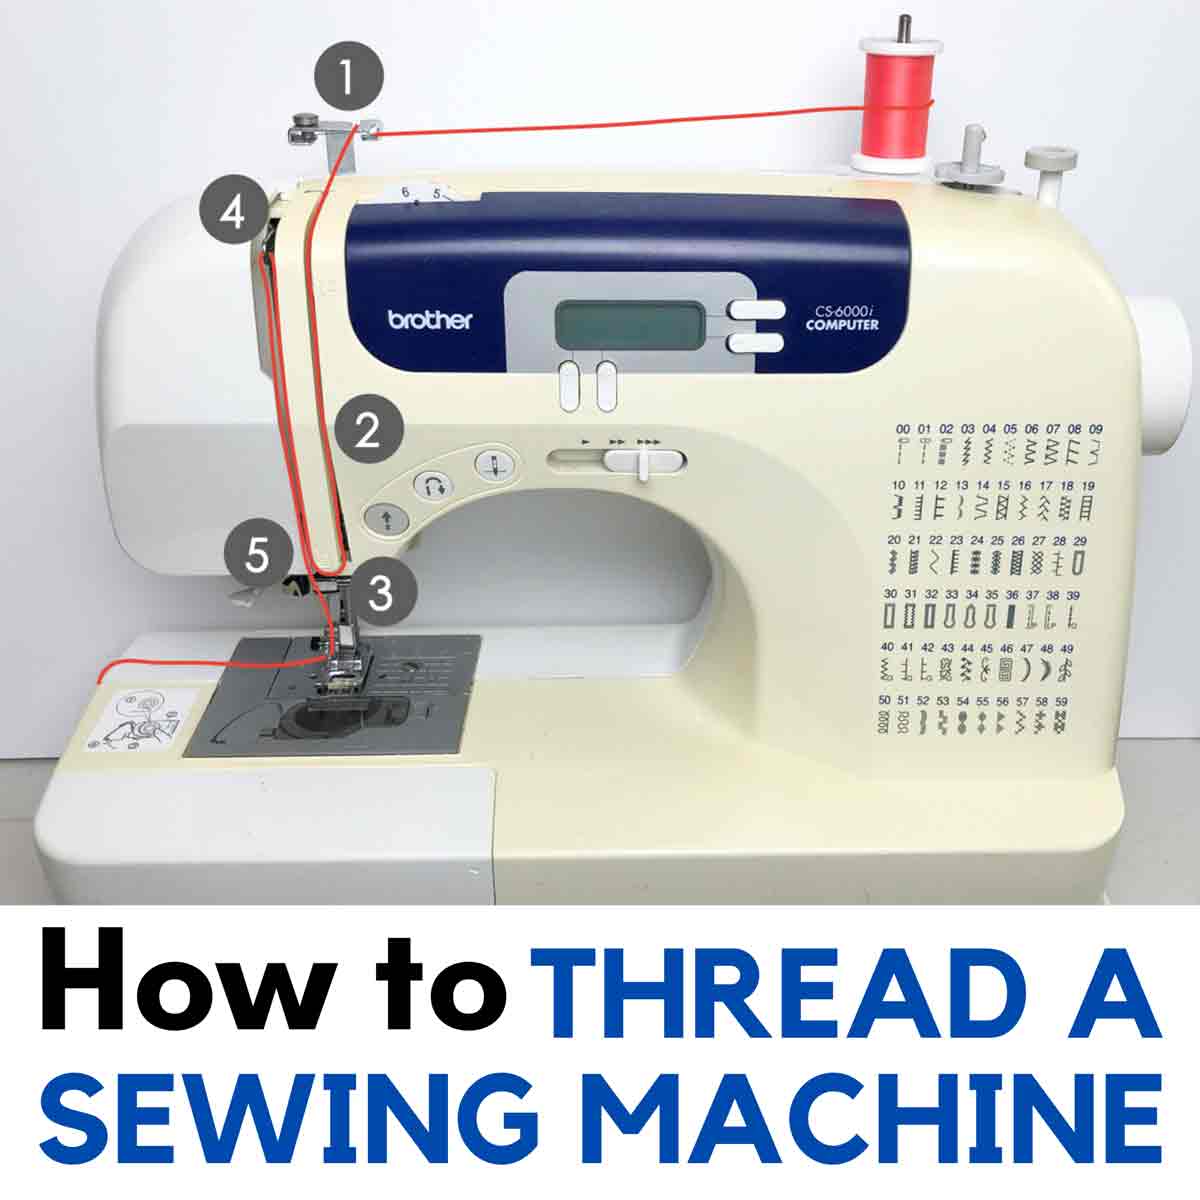
The Brother Sewing Machine Upper Thread Path
Your Brother sewing machine has a series of thread guides designed to control the thread and apply the correct tension. You must follow this path precisely.
- First Thread Guide: Take the thread from the spool and bring it to the first thread guide, usually located at the top of the machine.
- Thread Tension Disc: This is a very important part of the Brother sewing machine thread path. Guide the thread down and loop it around the tension discs. Crucially, the thread must go between the two discs. If it bypasses them, you won’t have any tension, and your stitches will be loose.
- Take-up Lever: Now, guide the thread upwards to the take-up lever. Loop the thread through the eye of the take-up lever. Make sure the thread goes from right to left or left to right as indicated by the arrows on your machine.
- More Thread Guides: Continue guiding the thread down, following all the numbered or indicated thread guides on your machine. These guides are essential for maintaining the correct thread path and tension.
- Needle Clamp Thread Guide: There’s usually a small thread guide near the needle clamp. Don’t forget this one!
- Needle Threading: Finally, bring the thread to the needle.
Threading the Needle Eye
Brother sewing machines typically have two main ways to thread the needle: manually or using an automatic needle threader.
Manual Needle Threading
- Cut the Thread End: Make sure the end of the thread is cut cleanly and is not frayed. You can use scissors or a thread cutter.
- Position the Thread: Hold the thread to the front of the needle eye.
- Push Through the Eye: Carefully push the thread through the eye of the needle. Some people find it easier to slightly bend the thread end to make it stiffer.
- Pull Through: Pull about 4-6 inches of thread through the needle eye.
Automatic Needle Threader (If Equipped)
Many Brother sewing machines come with an automatic needle threader, which simplifies this step immensely.
- Raise the Needle: Ensure the needle is in its highest position.
- Follow Machine Instructions: Your Brother sewing machine manual will have specific instructions for its automatic needle threader. Generally, you’ll bring the thread to a hook or slot, and a lever or mechanism will push the thread through the needle eye.
- Engage the Threader: Usually, you’ll lower a small wire hook or engage a lever.
- Bring Thread to Hook: Bring the thread up to the hook and gently pull it across.
- Activate the Threader: Press the needle threader lever or button. The hook will swing through the needle eye, carrying the thread with it.
- Pull Through: A small loop of thread will emerge from the other side. Pull this loop through with your fingers.
Step 4: Bringing Up the Bobbin Thread
You’ve threaded the needle, but you’re not done yet. You need to bring the bobbin thread up to meet the upper thread.
- Hold the Upper Thread: With one hand, gently hold the end of the upper thread that you just pulled through the needle.
- Turn the Handwheel: With your other hand, slowly turn the handwheel towards you. This will lower the needle, catch the bobbin thread, and bring it up through the bobbin case and needle plate.
- Retrieve the Bobbin Thread: As the needle rises, you should see a small loop of the bobbin thread emerge. Use your fingers or a seam ripper to gently pull this loop up and out.
- Position the Threads: Now you should have both the upper thread and the bobbin thread ends sticking out from under the presser foot. Place both thread tails behind the presser foot and to the left.
Step 5: Setting the Brother Sewing Machine Thread Tension
Correct Brother sewing machine thread tension is vital for a balanced stitch. If your tension is too tight or too loose, your stitches will look messy.
Factors Affecting Thread Tension
- Thread Type: Different threads (cotton, polyester, silk) have different thicknesses and can affect tension.
- Needle Size: A needle that is too large or too small for the thread can cause tension problems.
- Bobbin Winding: As mentioned, an unevenly wound bobbin can lead to poor tension.
- Thread Path: Not following the Brother sewing machine thread path correctly, especially around the tension discs, is a common cause of tension issues.
- Machine Settings: Your Brother sewing machine has tension dials for both the upper thread and sometimes the bobbin.
Adjusting Thread Tension
- Upper Thread Tension: This is usually controlled by a numbered dial or knob on the front or top of your machine. A higher number generally means tighter tension, and a lower number means looser tension.
- Bobbin Tension: The bobbin tension is often factory-set and less frequently adjusted. If you need to adjust it, it’s usually done by a tiny screw on the bobbin case itself. Only adjust this if you are confident or have instructions from your Brother sewing machine manual. A slight turn is usually all that’s needed.
How to Test Your Tension
The best way to check your Brother sewing machine thread tension is to sew a test stitch on a scrap piece of your fabric.
- Set to Default: Start with the tension dials set to the recommended default setting (usually a ‘4’ or ‘5’ for the upper thread).
- Sew a Test Line: Sew a straight line on your fabric scrap.
- Examine the Stitch:
- Balanced Stitch: The stitches on both sides of the fabric should look uniform and identical.
- Upper Thread Too Tight: You’ll see the bobbin thread loops showing on the top side of the fabric. To fix this, lower the upper thread tension (turn the dial to a lower number).
- Upper Thread Too Loose (or Bobbin Thread Too Tight): You’ll see the upper thread loops showing on the underside of the fabric. To fix this, increase the upper thread tension (turn the dial to a higher number).
You may need to make small adjustments and re-test until you achieve a perfect stitch.
Troubleshooting Common Brother Sewing Machine Threading Issues
Even with careful threading, you might encounter problems. Here are some common Brother sewing machine troubleshooting tips.
Thread Breaking
- Reason: Needle is bent or dull, thread is caught in guides, tension is too high, old or poor-quality thread, needle is inserted incorrectly.
- Solution: Replace the needle, re-thread the machine ensuring all thread guides are used, adjust tension, use good quality thread, and ensure the needle is inserted correctly with the flat side to the back.
Skipped Stitches
- Reason: Blunt or bent needle, needle inserted incorrectly, incorrect needle size for fabric/thread, thread path not followed correctly, lint build-up in the bobbin area.
- Solution: Insert a new, sharp needle correctly. Ensure the needle is the right size for your fabric. Re-thread the machine and clean out any lint from the bobbin case and feed dogs.
Thread Bunching or Puckering Underneath
- Reason: Upper thread tension is too loose, or bobbin thread tension is too tight.
- Solution: Adjust the upper thread tension to a higher setting. If the problem persists, you may need to slightly increase the bobbin tension (refer to your Brother sewing machine manual).
Thread Bunching or Puckering on Top
- Reason: Upper thread tension is too tight, or bobbin thread tension is too loose.
- Solution: Lower the upper thread tension. If the problem persists, you may need to slightly decrease the bobbin tension (refer to your Brother sewing machine manual).
Machine Not Sewing or Making Strange Noises
- Reason: Presser foot is not lowered, needle is broken or not inserted properly, thread is caught somewhere in the machine.
- Solution: Ensure the presser foot is down. Check the needle for damage and reinsert it if necessary. Re-thread the entire machine carefully.
Frequently Asked Questions (FAQ)
Q1: What is the correct way to thread the Brother sewing machine?
A1: The correct way to thread your Brother sewing machine involves following a specific thread path from the spool, through the tension discs, take-up lever, various thread guides, and finally through the needle eye. It also requires properly winding and inserting the bobbin. Always refer to your Brother sewing machine manual for your specific model’s threading path.
Q2: Why is my Brother sewing machine upper thread breaking?
A2: Upper thread breakage can be caused by a variety of issues: a dull or bent needle, incorrect needle insertion, the thread not being properly seated in the tension discs, excessive thread tension, or using poor-quality thread.
Q3: Can I use any type of thread on my Brother sewing machine?
A3: While you can use various types of thread, it’s best to use good quality thread appropriate for your fabric and project. Your Brother sewing machine manual will often suggest recommended thread types. Very thick or very thin threads, or threads with a lot of fuzz, might require different tension settings or needle types.
Q4: My stitches are uneven. What should I do to fix the Brother sewing machine thread tension?
A4: Uneven stitches are usually a sign of incorrect thread tension. First, ensure you have followed the Brother sewing machine thread path correctly. Then, try adjusting the upper thread tension dial. If the bobbin thread is showing on top, the upper thread tension is likely too loose; if the upper thread is showing on the bottom, it’s too tight.
Q5: How do I know if my Brother sewing machine bobbin winding is correct?
A5: A correctly wound bobbin should be wound evenly, without gaps or overlaps, and filled to about three-quarters of its capacity. The thread should unwind smoothly. An unevenly wound bobbin can cause problems with the Brother sewing machine lower thread and affect stitch quality.
Q6: What if my automatic needle threader on my Brother sewing machine isn’t working?
A6: If your automatic needle threader is not working, first ensure you are following the specific instructions for your model in the Brother sewing machine manual. Check that the needle is properly inserted and that the thread is positioned correctly for the threader mechanism. Sometimes, a slightly bent needle or a frayed thread end can prevent the threader from working.
By following these detailed steps and tips, you’ll be able to confidently thread your Brother sewing machine and enjoy a smooth and satisfying sewing experience. Remember, practice makes perfect, and your Brother sewing machine manual is your ultimate guide!