
Image Source: mellysews.com
Master Perfect Edges With How To Use Bias Tape Sewing
How do you use bias tape when sewing? Using bias tape involves folding a fabric strip cut on the bias (diagonal grain) around a raw edge and sewing it down to create a clean finish. This ‘edge binding technique’ is perfect for ‘finishing raw edges’ on things like necklines, armholes, and hems. It’s a simple way to make your sewing projects look neat and tidy, giving them a professional feel. This guide will show you how to master the art of ‘sewing bias binding’ and create beautiful edges every time.
Grasping Bias Tape Basics
What is bias tape? It’s a narrow strip of fabric. We cut it on the bias grain. This means we cut it at a 45-degree angle to the selvage. Why cut it this way? Cutting on the bias gives the fabric strip stretch. This stretch is important. It helps the tape curve smoothly around rounded edges. It’s great for ‘sewing curves with bias tape’. It also works well for ‘binding corners with bias tape’. Bias tape comes in different widths. It can be single fold or double fold.
Why Use Bias Tape?
Bias tape makes edges look nice. It hides the rough fabric edge. This stops the fabric from fraying. It’s strong. It makes the edge last longer. It’s useful for many projects. Think of clothing. Think of quilts. Think of home decor items. ‘Applying bias tape’ is a key skill for sewers. It’s a neat ‘bias tape application’ method.
Types of Bias Tape
There are two main types of bias tape you can buy. You can also make your own.
Single Fold Bias Tape
Single fold bias tape has its raw edges folded to the center on one side. It looks like a ribbon with folded edges. You often see this tape used on the inside of clothes. It finishes an edge but stays hidden. To use it, you unfold one edge, sew it to the fabric, then fold it over the edge and sew again.
Double Fold Bias Tape
Double fold bias tape starts as single fold. Then, it is folded in half lengthwise. This hides the raw edges inside the fold. When you buy double fold tape, it looks like a strip folded in four layers. This tape is great for edges where the binding will show. It gives a clean look on both sides. ‘Using double fold bias tape’ is common for visible edges.
Making Your Own Bias Tape
You can make bias tape yourself. This lets you match your fabric exactly. You can use any fabric you like. You cut strips on the bias. The width of the strip depends on the final tape width you want. For single fold, you fold the raw edges to the center. For double fold, you fold those edges to the center, then fold the whole strip in half. A bias tape maker tool can help with the folding.
Steps to Make Bias Tape
- Start with a square or rectangle of fabric.
- Cut the fabric diagonally. Cut across the grain at a 45-degree angle.
- You get bias strips. Cut these strips the width you need. For example, a 2-inch wide strip makes 1/2-inch double fold tape.
- Join strips together if needed. Put right sides together. Sew diagonally. Trim extra fabric.
- Press seams open.
- Use a bias tape maker tool. Feed the strip into the tool. The tool folds the edges.
- Press the folds with an iron as the strip comes out.
- If making double fold, fold the pressed single fold strip in half lengthwise. Press again.
Making your own tape saves money. It also gives you endless color and pattern options.
Getting Ready for Bias Tape Application
Before you start ‘attaching bias tape’, you need to get ready. This means preparing your fabric edge and your bias tape.
Prepare Your Fabric Edge
Make sure the edge you will bind is clean. Trim away any extra threads. If the edge is very curved or complex, you might sew a row of stitches close to the edge. This can help stabilize it. It makes ‘sewing curves with bias tape’ easier.
Prepare Your Bias Tape
If you made your own tape, it’s ready. If you bought it, it’s likely pre-folded. You can use it as is. Sometimes, pressing it again can help set the folds sharply. For single fold tape, you will unfold one edge before sewing. For double fold tape, you will slip the edge inside the fold.
Sewing Single Fold Bias Tape
‘Attaching bias tape’ using the single fold method gives a neat finish on one side. The raw edge is hidden inside the fold.
Step-by-Step Single Fold Method
- Open one fold: Take your single fold bias tape. Open up one of the pressed folds.
- Line up edges: Place the raw edge of the tape right sides together with the raw edge of your fabric. The unfolded edge of the tape should line up with the fabric edge.
- Stitch: Sew along the first fold line of the bias tape. This line was pressed into the tape. Sew a straight line.
- Trim seam allowance (optional): For bulky fabrics, you can trim the fabric edge slightly. This makes the finished edge less bulky.
- Fold over: Fold the bias tape up and over the fabric edge. The fold you just sewed on becomes the new edge. The tape wraps around the fabric edge.
- Fold again and press: Fold the tape again so the second folded edge covers the stitching line on the back of your fabric. Pin it in place. Press it well.
- Stitch again: Sew close to the folded edge of the bias tape on the right side of your fabric. This second stitch secures the tape to the fabric.
This method is good for facings or edges that won’t be seen from both sides. It’s a clean way of ‘finishing raw edges’.
Sewing Double Fold Bias Tape
‘Using double fold bias tape’ is simpler than single fold. It’s often used when both sides of the edge will show. The raw fabric edge slips inside the tape’s fold.
Step-by-Step Double Fold Method
- Open bias tape: Take your double fold bias tape. Open up one of the main folds so it looks like single fold tape. It will have two folded edges that meet in the middle.
- Line up raw edge: Place the raw edge of the bias tape right sides together with the raw edge of your fabric. Line up the edge of the tape that is just one fold away from the center line.
- Stitch: Sew along the fold line closest to the edge. Use a consistent seam allowance.
- Wrap the edge: Fold the bias tape up and over the raw fabric edge. The fabric edge should sit right inside the main fold of the tape.
- Fold again and pin: Fold the tape again so the other folded edge wraps around to the back of the fabric. This second fold of the tape should cover your first line of stitches on the back. Pin the tape in place from the right side. Check the back to make sure the fold covers the stitches.
- Stitch from the front: Sew close to the inner folded edge of the bias tape from the right side of your fabric. This stitch goes through all layers. It catches the folded edge on the back.
This ‘bias tape application’ method creates a sturdy, clean edge on both sides. It’s excellent for projects like placemats, bibs, or quilt bindings. It’s a popular ‘edge binding technique’.
Tackling Curves with Bias Tape
Bias tape is great for curves. Its bias cut lets it bend easily. ‘Sewing curves with bias tape’ needs care. Go slow.
Tips for Sewing Curves
- Cut on a true bias: Make sure your tape is cut exactly on the 45-degree angle. This gives it maximum stretch.
- Do not stretch the tape: When ‘attaching bias tape’ to a curve, don’t pull the tape tight. Let it curve naturally around the fabric edge. If you pull it straight, it will make the fabric edge ripple.
- Ease the fabric: On tight curves, you might need to ease the fabric edge slightly into the bias tape. This means gently fitting a bit more fabric length into the tape length.
- Pin well: Use lots of pins to hold the tape in place along the curve. Place pins close together.
- Sew slowly: Go slow, especially on tight curves. Stop often with the needle down in the fabric. Lift the presser foot. Pivot the fabric slightly to follow the curve.
- Clip the curve (sometimes): On very tight curves, especially on the fabric edge before adding tape, you might make small cuts into the seam allowance. Do not cut into your stitching line. This helps the fabric edge spread slightly. This makes ‘sewing curves with bias tape’ smoother.
Whether using single or double fold, the key is to let the tape curve without forcing it. It’s about guiding the fabric and the tape together smoothly.
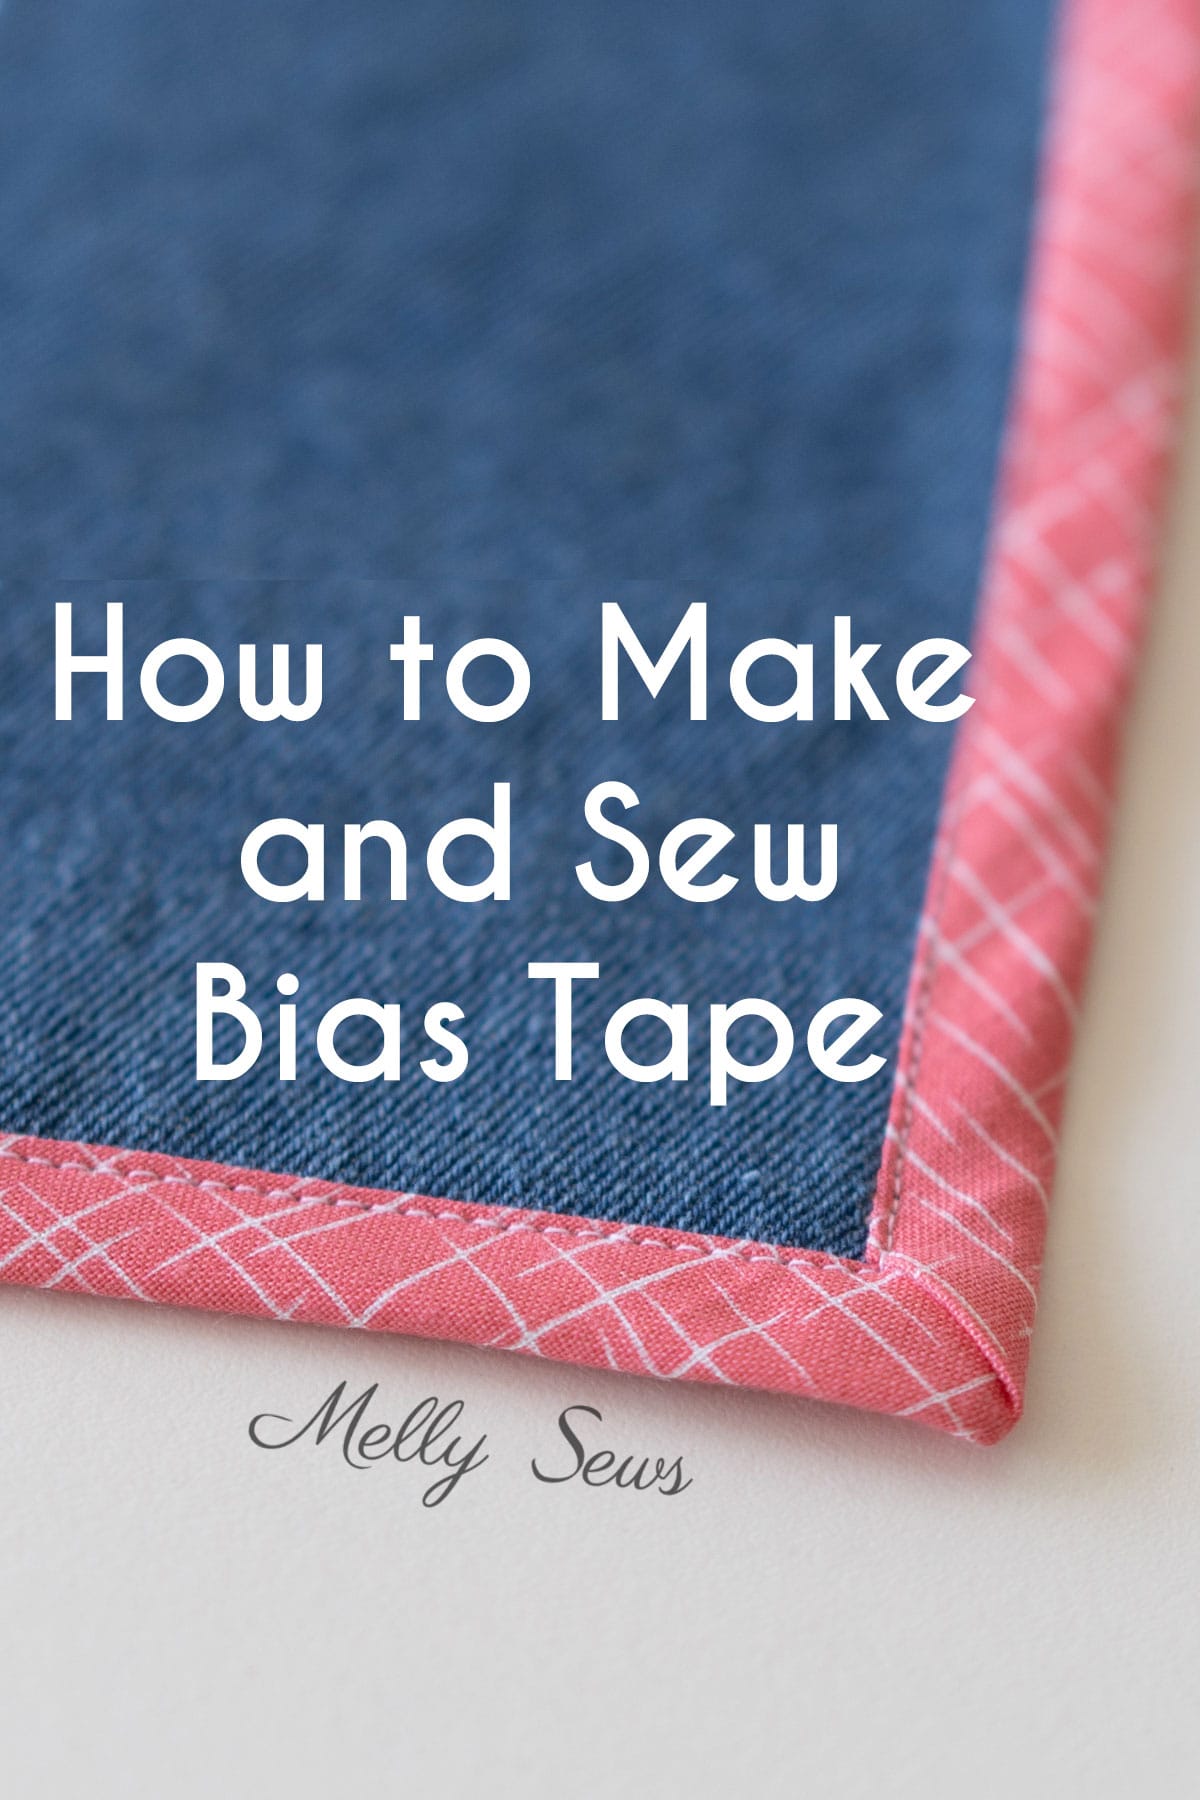
Binding Corners with Bias Tape
Corners can be tricky. There are different ways to handle them. You can make a mitered corner. Or you can do a simple fold. ‘Binding corners with bias tape’ neatly gives a professional look.
Simple Folded Corner
This is the easiest way. When you reach a corner:
- Sew the tape up to the corner. Stop stitching about a seam allowance away from the edge.
- Fold the tape straight up, away from the fabric edge. Make a diagonal fold.
- Then fold the tape back down along the next edge of the fabric. This makes a little pleat or tuck at the corner.
- Start sewing again from the new edge. Sew over the fold.
- When you do the second stitching line (for either single or double fold tape), make sure to catch the folded corner neatly.
This creates a slightly rounded or tucked corner. It’s fast and works well for many items.
Mitered Corner with Bias Tape
A mitered corner looks sharp and clean. It’s a bit more work.
- First Pass: Sew the bias tape along the first edge towards the corner. Stop sewing a seam allowance away from the corner. Backstitch to secure. Cut the thread.
- Fold at the corner: Fold the tape straight up at a 45-degree angle from where you stopped sewing. The tape should go away from the fabric edge.
- Fold down: Fold the tape back down along the next fabric edge. Make sure the top folded edge of the tape lines up with the fabric edge you are about to sew. This creates a neat diagonal fold at the corner.
- Start next edge: Start sewing again right at the corner point. Sew along the new fabric edge, securing the folded tape underneath.
- Complete the binding: Continue sewing all around the item. When you come back to the first corner, you will see the diagonal fold you made.
- Second Pass (Double Fold Example): Now, wrap the tape around to the other side. At the corner, the diagonal fold you made on the first pass will help the tape fold into a miter. Fold the tape neatly into a mitered corner on the back side. Pin well.
- Stitch: Sew your second line of stitches from the front, close to the inner fold. As you reach the mitered corner, make sure your stitch catches the miter on the back. You might need to pivot carefully at the point of the miter.
This method creates a clean, angled corner just like woodworking miters. It’s a classic ‘binding corners with bias tape’ technique.
Applying Bias Tape to a Neckline
‘Sewing a neckline with bias tape’ is a common use. Necklines are often curved. They need the flexibility of bias tape.
Method for Necklines (Facing Style)
This uses single fold tape or double fold opened up. It creates a neat finish on the inside.
- Prepare the neckline: Finish the shoulder seams of your garment. Press the neckline edge smooth.
- Join bias tape ends: Join the ends of your bias tape strip to form a loop. Sew them right sides together. Press the seam open.
- Marking: Mark the quarter points (front center, back center, shoulder seams) on both the neckline and the bias tape loop.
- Attach tape: Pin the open bias tape loop to the raw edge of the neckline, right sides together. Match up the quarter marks. The unfolded edge of the tape goes against the fabric edge.
- Stitch: Sew along the first fold line of the bias tape. Sew slowly around the curve. Do not stretch the tape or the neckline fabric. Let them ease together.
- Trim and clip: Trim the seam allowance if it’s bulky. Clip curves gently. Cut small V-shapes or snips into the seam allowance. Do not cut into your stitches. This helps the curve lie flat.
- Press seam: Press the seam allowance towards the bias tape.
- Understitch: Sew a line of stitches on the bias tape, close to the seam line. This stitching goes through the tape and the seam allowance. This is called understitching. It helps the bias tape roll smoothly to the inside.
- Fold and press: Fold the bias tape to the inside of the garment. The folded edge covers the raw neckline edge. Press it flat.
- Final stitch: Sew the bias tape down to the inside of the garment. You can stitch close to the folded edge of the bias tape. Or you can stitch from the right side of the garment, close to the neckline edge.
This results in a smooth, finished neckline edge on the inside of the garment.
Method for Necklines (Binding Style)
This uses double fold tape. The tape wraps around the edge.
- Prepare the neckline: Finish shoulder seams. Press the neckline.
- Join bias tape ends (optional): You can join the tape ends into a loop first. Or you can leave them open and overlap them neatly at the back neckline later.
- Attach tape: Open up the double fold tape. Pin one side of the tape (the side with two folds) to the right side of the neckline, lining up the raw edges.
- Stitch: Sew along the first fold line of the bias tape. Sew slowly around the curve.
- Wrap the edge: Wrap the bias tape around the raw neckline edge to the inside. The fabric edge sits inside the main fold of the tape.
- Pin: Pin the tape in place from the right side. Make sure the folded edge on the inside covers your first line of stitches.
- Final stitch: Stitch from the right side of the garment, close to the inner folded edge of the bias tape. This stitch catches the tape on both the front and back.
This creates a visible bias tape edge around the neckline. It’s a clean ‘bias tape application’ method. ‘Sewing a neckline with bias tape’ adds strength and a decorative touch.
Finishing Raw Edges with Bias Tape
Bias tape is a top choice for ‘finishing raw edges’. It works on straight edges, curves, and corners. It stops fraying. It adds durability. It makes projects look complete.
Where to Use Bias Tape for Finishing
- Armholes: Just like necklines, armholes are often curved. Bias tape is perfect for them. Use the facing or binding method.
- Hems: Especially on curved hems, bias tape works better than simply folding and stitching.
- Quilt Edges: ‘Sewing bias binding’ is the standard way to finish a quilt edge. Double fold binding is most common.
- Home Decor: Placemats, potholders, napkins, table runners. Bias tape gives them a clean edge.
- Bags and Pouches: Binding the edges of pockets or main seams makes them stronger.
This ‘edge binding technique’ is versatile. It gives a professional touch to almost any edge.
Overcoming Common Bias Tape Issues
Sometimes, things don’t go perfectly. Bias tape can cause ripples or puckers.
Tips for Smooth Bias Tape
- Use the right tension: Check your sewing machine tension. Too tight tension can cause puckering.
- Do not stretch: This is key, especially on curves. Let the tape lay naturally.
- Press as you go: Pressing after each stitching line helps the tape lay flat. Pressing the finished edge is also important.
- Clip curves: Remember to clip those seam allowances on tight curves before folding the tape over. This helps the fabric spread.
- Practice: Like any skill, ‘attaching bias tape’ gets easier with practice. Start on scrap fabric.
If your bias tape looks wavy after sewing, pressing it well with steam can help. Sometimes, a wavy edge means the fabric edge was stretched when sewing.
Summary Table: Bias Tape Types & Uses
Let’s quickly look at the main types and how they are used.
| Bias Tape Type | Appearance | Fold Status When Bought | Common Use Case | Best for Visibility |
|---|---|---|---|---|
| Single Fold | Edges folded to middle | Already folded | Facing (inside finish) | Hidden |
| Double Fold | Folded in half lengthwise | Already folded | Binding (visible edge finish) | Visible |
| Homemade | Can be single or double | You fold it | Matching fabric, custom colors/sizes | Both hidden/visible |
This table helps decide which tape to use for ‘finishing raw edges’.
Mastering the Art of Sewing Bias Binding
‘Sewing bias binding’ is more than just sewing a strip of fabric. It’s about control. It’s about letting the fabric and the tape work together.
Precision in Stitching
Your stitching line is important. When doing the first stitch (attaching the tape to the raw edge), sewing right on the tape’s fold line helps guide you. When doing the second stitch (securing the folded tape), aim for a consistent distance from the folded edge. This stitch will be visible. Practice sewing straight lines or smooth curves.
Fabric Choices
Bias tape works with most fabrics. The fabric you use for the tape should be able to fold and press well. Cotton is a popular choice for homemade bias tape. It holds a press nicely. The fabric you are binding can be anything from lightweight silk to heavy canvas. The key is adjusting your technique. For thick fabrics, you might need wider bias tape. You might also need to trim seam allowances more.
Advanced Bias Tape Techniques
Once you are comfortable with the basics, you can try more advanced uses.
Decorative Bias Tape
Bias tape doesn’t have to be just functional. It can add color or contrast. Use bright tape on a neutral fabric. Use striped or patterned tape. This turns the ‘edge binding technique’ into a design feature.
Continuous Bias Binding
For very long edges, like quilts, making continuous bias binding is helpful. You sew a large rectangle of fabric into a tube. Then you cut around the tube in a spiral fashion. This creates one long, continuous bias strip without lots of joins. This is great for large ‘bias tape application’ projects.
Piping with Bias Tape
You can use bias tape to make piping. Piping is a cord covered in fabric. You fold bias tape around a cord and stitch close to the cord. Then you sew this piping into a seam or along an edge. This adds a raised, finished edge. It’s a decorative way of ‘finishing raw edges’.
Common Questions About Bias Tape
Here are some things people often ask about bias tape.
FAQ Section
Q: Can I use straight-grain fabric for bias tape?
A: You can, but it won’t stretch or curve well. Bias tape needs the stretch from the diagonal cut. Using straight-grain fabric will make it hard to sew around curves and corners without puckering.
Q: How wide should I cut fabric for homemade bias tape?
A: The width you cut depends on the finished width you want.
– For 1/2 inch finished double fold tape, cut 2 inches wide strips.
– For 1/4 inch finished double fold tape, cut 1 inch wide strips.
– For 1/2 inch finished single fold tape, cut 1 3/4 inches wide strips.
– For 1/4 inch finished single fold tape, cut 1 inch wide strips.
Always test with a scrap piece if unsure.
Q: How do I join multiple pieces of bias tape?
A: Put the ends of the strips right sides together at a 90-degree angle. Draw a line diagonally from corner to corner where they meet. Sew along this line. Trim the seam allowance to 1/4 inch. Press the seam open. This makes a flat join.
Q: How much bias tape do I need?
A: Measure the length of the edge you want to bind. Add a few extra inches for joining ends and corners. If binding a circle, measure the circumference. If binding a square, measure all four sides and add extra for corners.
Q: My bias tape looks wavy after sewing. Why?
A: This usually happens if you stretched the bias tape or the fabric edge while sewing. Remember to let the tape lay naturally, especially on curves. Pressing with steam can sometimes help reduce waviness.
Q: Can I wash bias tape?
A: Yes. If you make your own, pre-wash the fabric first, just like your main project fabric. Store-bought bias tape is usually pre-shrunk, but checking the package helps.
Final Thoughts on Bias Tape
Mastering ‘how to use bias tape sewing’ opens up many possibilities in your sewing projects. It’s a vital ‘edge binding technique’ for giving your handmade items a polished, durable finish. Whether you are ‘attaching bias tape’ to a simple straight edge or ‘sewing curves with bias tape’ on a complex neckline, the principles are the same: cut on the bias, handle with care, press as you go, and sew slowly around corners and curves. Practice using single fold for hidden finishes and double fold for visible bindings. Learn ‘binding corners with bias tape’ neatly. Gain confidence in ‘sewing a neckline with bias tape’. With a little patience and practice, you’ll be ‘finishing raw edges’ like a pro using this simple yet effective method. Happy sewing!