
Framing your finished embroidery is a wonderful way to show off your hard work. It turns your textile piece into lasting art for your walls. People often ask, “Can I frame embroidery myself?” and “What is the best way to frame needlepoint or cross stitch?” Yes, you absolutely can frame embroidery yourself! There are several ways, from simple methods like framing hoop embroidery to more involved steps like stretching embroidery for framing onto a board. The best way to frame needlepoint or framing cross stitch often depends on the piece’s size, fabric, and how it will be displayed. This guide will walk you through the steps to frame your beautiful needlework, helping you choose the right path for your project.
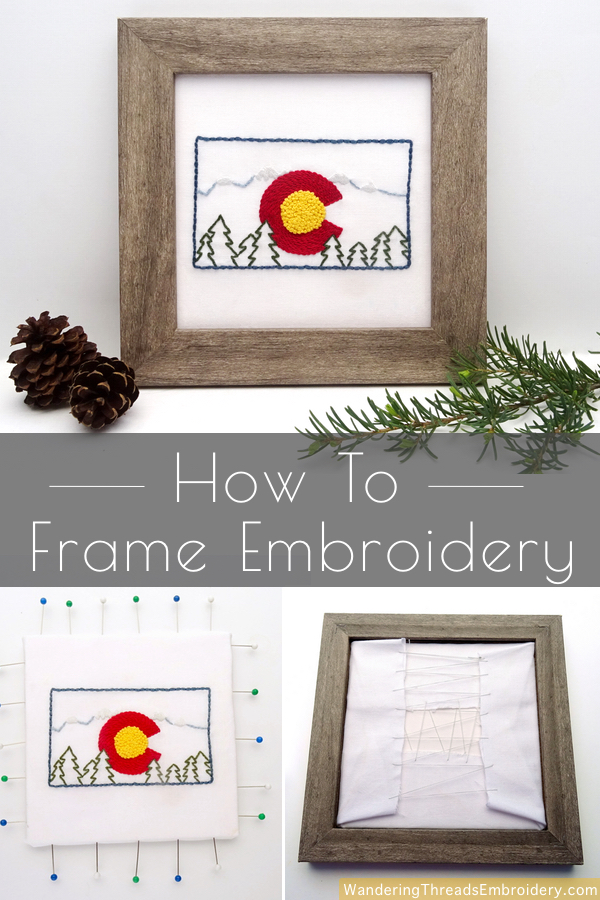
Image Source: www.wanderingthreadsembroidery.com
Get Your Embroidery Ready
Before you put your needlework in a frame, it needs some care. Making it clean and neat is important. This helps it look its best and last a long time in the frame.
Making It Clean
Sometimes, your needlework might get a little dirty while you work on it. It’s a good idea to clean it gently if needed.
- Check if cleaning is needed: Look closely at your fabric and threads. Are there any marks or dirt?
- Gentle wash: If it needs washing, use cool or lukewarm water. Use a very mild soap, like one for babies or delicate clothes.
- Don’t rub hard: Just let the piece soak in the soapy water for a bit. You can swish it gently. Rubbing hard can hurt the stitches or fabric.
- Rinse well: Wash away all the soap with clean, cool water.
- Squeeze gently: Don’t wring or twist it. Just press the water out softly.
- Roll in a towel: Lay the wet piece flat on a clean, dry towel. Roll the towel up to take out more water.
Making It Flat
Once your embroidery is clean (or if it didn’t need washing), you need to make it smooth and flat. This is a key part of stretching embroidery for framing.
- Dampen it lightly: If it’s dry, you can make it a little damp. Use a spray bottle with clean water or lay a damp cloth over it.
- Iron it carefully: Place your embroidery face down on a soft towel. Use a medium heat iron. Iron the back of the piece. The towel protects the stitches on the front.
- Press, don’t slide: Just press the iron down onto the fabric. Don’t slide it back and forth like ironing clothes. This can pull stitches out of shape.
- Get all wrinkles out: Press until the fabric is smooth and flat. Let it cool down completely.
Check Everything
After washing and pressing, check your work one last time. Make sure all stitches are correct and the fabric is clean and flat. This preparation is vital, especially for conservation framing textile art, where the goal is to preserve the piece for many years.
Choose How To Frame
There are two main ways to frame your embroidery: you can do it yourself (DIY embroidery framing) or you can take it to a shop that does custom framing embroidery. Both have good points.
DIY Framing: Doing It Yourself
- Good for: Smaller pieces, projects framed in a hoop, or if you want to save money.
- What you do: You buy the frame and materials and do the work yourself. This gives you control but requires learning the steps.
- Methods: You can mount it on a board, frame it in the hoop it was made in (framing hoop embroidery), or use a mat.
Custom Framing: Asking the Experts
- Good for: Larger or complex pieces, valuable pieces, or if you want the best quality and protection.
- What they do: A professional framer has the tools and knowledge to frame your piece perfectly. They use acid-free framing materials and proper techniques like lacing embroidery board.
- Benefits: They can offer conservation framing textile art. This means they use special methods to protect your work from light, dust, and damage over time. This is often the best way to frame needlepoint or framing cross stitch pieces that you want to last a very long time.
Let’s look more closely at the DIY steps.
Frame It Yourself: Step-By-Step Guides
Here are some ways to frame your embroidery at home. Each method has its own steps.
Method 1: Mounting on a Board (Stretching and Lacing)
This is a common and good way to frame embroidery or framing cross stitch. It keeps the fabric tight and smooth. This method often uses lacing embroidery board.
What You Need:
- Your pressed embroidery
- Acid-free mounting board (sometimes called foam core board, but make sure it’s acid-free)
- Stainless steel pins or staples (stainless steel won’t rust)
- Strong thread (like quilting thread or linen thread)
- Sharp scissors
- Measuring tape or ruler
- Pencil
- Frame with glass and backing board
- Acid-free mat (optional, but recommended)
- Gummed paper tape (acid-free)
- Gloves (cotton or nitrile, keeps oils from your hands off the fabric)
Steps:
h4. Pick and Cut Your Board
- Choose an acid-free mounting board. This is important because regular board can yellow your fabric over time. Conservation framing textile art always uses acid-free materials.
- Measure your embroidery. Decide how much border you want around it, or if it should fill the window of the mat.
- Cut the mounting board slightly smaller than the inside size of your frame. If you are using a mat, cut the board to fit inside the mat opening, leaving a small overlap (about 1/4 inch or 0.5 cm) hidden by the mat edge.
h4. Center Your Embroidery
- Lay your cut board on a clean, flat surface.
- Place your pressed embroidery face up on the board.
- Move it around until it is perfectly centered and straight.
- Make sure you have enough extra fabric around the edges of the board (at least 2 inches or 5 cm is good for lacing).
h4. Pin It in Place (Temporary)
- Put a pin in the center of each side of the fabric edge and into the edge of the board. Just enough to hold it while you check if it’s straight.
- Step back and look. Is it straight? Adjust if needed.
h4. Start Stretching and Lacing
This is the part about stretching embroidery for framing. Lacing embroidery board is a good way to do this because it holds the fabric tight without using glues or tapes that could harm the fabric later.
- Turn the board and fabric over so the fabric is face down and the board is on top of it.
- The extra fabric should be sticking out around the board.
- Fold one edge of the fabric smoothly over the back of the board.
- Put a pin through the folded edge and into the board, close to the center of that side.
- Go to the exact opposite side. Pull the fabric taut, fold it over the back of the board, and put a pin in the center of that side.
- Do the same for the other two sides, pulling gently to stretch the fabric tight.
- Now add more pins along each side, working from the center towards the corners. Put pins every 1-2 inches (2.5-5 cm). Pull the fabric gently but firmly as you go. Keep the tension even.
- The goal is to make the fabric smooth and flat on the front with no wrinkles or sags.
h4. Lacing the Back (Optional but Recommended)
Lacing makes the stretch permanent and allows you to adjust tension later if needed. This is a key technique in framing cross stitch and other needlework properly.
- With the fabric pinned on the back, take your strong thread.
- Start at one side. Thread a needle.
- Stitch across the back, from one pinned edge of the fabric to the opposite pinned edge. Imagine you are lacing up a shoe.
- Pass the needle through the folded fabric edge, across the gap, and through the fabric edge on the other side.
- Make stitches about 1/2 inch (1 cm) apart.
- Pull the thread gently to keep the fabric tight. Don’t pull so hard you distort the stitches on the front.
- Work your way up one pair of opposite sides.
- Then do the same for the other pair of opposite sides, lacing across the first set of laces.
- When you reach the corners, fold the excess fabric neatly like you’re wrapping a gift. Pin or stitch it down securely so it doesn’t show from the front.
h4. Add the Mat
- If you’re using a mat (matting needlepoint helps keep the fabric from touching the glass), place it over your mounted embroidery.
- Line it up correctly.
- Use acid-free gummed paper tape along the top edge to attach the mat to the mounting board. This hinge allows you to lift the mat if needed later. Only tape along the top.
h4. Put It in the Frame
- Place the mounted embroidery (with the mat if used) into the frame.
- Add the backing board that came with the frame.
- Secure everything in place using the frame’s clips or points.
- Add hanging hardware to the back of the frame.
h4. Clean the Glass
- Before you close the frame, make sure the glass is clean on both sides. Use glass cleaner and a lint-free cloth.
This method provides a flat, smooth display and protects the fabric.
Method 2: Framing Hoop Embroidery
Sometimes, you want to frame your piece right in the hoop you stitched it in. This is a popular method for framing hoop embroidery. It’s simple and gives a modern look.
What You Need:
- Your finished embroidery in a hoop
- Embroidery hoop that looks nice for display (wooden hoops are popular)
- Needle and strong thread
- Felt or backing fabric (optional, to cover the back)
- Scissors
Steps:
h4. Finish Your Embroidery in the Hoop
- Make sure your piece is centered and taut in the hoop. Tighten the screw firmly.
- Trim the extra fabric around the back edge of the hoop. Leave about 1-2 inches (2.5-5 cm) of fabric outside the hoop ring.
h4. Secure the Fabric Edge
There are a few ways to secure the fabric on the back:
- Gathering: Use a needle and strong thread. Stitch a running stitch all around the edge of the trimmed fabric circle. Pull the thread tight to gather the fabric towards the center on the back of the hoop. Knot the thread to hold it.
- Glue/Tape: You can use fabric glue or strong double-sided tape on the inside of the back hoop ring. Fold the fabric edge over and stick it down. Make sure the adhesive won’t seep through or yellow the fabric over time (acid-free options are best).
h4. Add Backing (Optional)
- Cut a circle of felt or backing fabric slightly larger than the hoop opening.
- Stitch or glue this circle to the back of the hoop to cover the gathered fabric edges and give a neat finish.
h4. Hang It Up
- Hoops often have a screw mechanism that you can use to hang them directly on a nail or hook.
- You can also tie a ribbon or string around the screw to hang it.
This method is quick and easy for framing hoop embroidery projects.
Method 3: Using a Mat and Simple Frame
This is similar to mounting on a board, but the mat is a key design element. Matting needlepoint adds space around your piece and can enhance its look.
What You Need:
- Your pressed embroidery
- Acid-free mounting board
- Acid-free mat board (cut with an opening slightly smaller than your embroidery)
- Acid-free gummed paper tape
- Frame with glass and backing board
- Stainless steel pins or thread for mounting (see Method 1 steps)
- Scissors, ruler, pencil
- Gloves
Steps:
h4. Prepare Embroidery and Board
- Prepare and press your embroidery as described earlier.
- Cut your acid-free mounting board to fit the frame.
- Cut your acid-free mat board. The mat should have an opening cut in the center. This opening should be just a bit smaller than your embroidery design so the edges of the fabric are hidden under the mat. You can buy pre-cut mats or cut your own using special tools. For matting needlepoint or other thick fabrics, make sure the mat is thick enough.
h4. Mount Embroidery to Board
- Center your embroidery on the acid-free mounting board.
- Secure it using temporary pins.
- Flip it over and stretch the fabric around the back. You can pin the edges down firmly, or use the lacing method described in Method 1 for a stronger, adjustable hold. Ensure the fabric is smooth and tight on the front.
h4. Attach the Mat
- Place the mat board face down.
- Place the mounted embroidery face up on top of the mat board, lining up the design in the mat’s opening.
- Once aligned, use acid-free gummed paper tape to create a hinge. Stick one side of the tape to the back of the mat and the other side to the mounting board, only along the top edge. This lets the mat open like a book cover from the top.
h4. Assemble the Frame
- Clean the glass.
- Place the mat (with the mounted embroidery attached) into the frame.
- Add the frame’s backing board.
- Secure everything with the frame’s clips or points.
- Add hanging hardware.
This method is great for framing cross stitch or needlepoint when you want a classic look with a border. Using acid-free matting is essential for protecting your fabric.
Ask a Pro: Custom Framing
For important pieces, custom framing embroidery by a professional is often the best way. They have special skills and materials, providing conservation framing textile art.
What They Offer
- Expertise: They know how to handle textiles properly. They understand stretching embroidery for framing without damaging it.
- Materials: They use only acid-free framing materials like acid-free mats, acid-free backing boards, and even special glass that protects from UV light. This is crucial for conservation framing textile art.
- Techniques: They use methods like lacing embroidery board which provides firm support without glues or tapes on the fabric itself. This reversible method is key for preserving the piece.
- Custom Look: They can help you choose the perfect frame, mat colors, and styles to match your home and your piece.
- Protection: They make sure your piece is protected from dust, bugs, and sunlight, which can cause damage over time.
- Best Way to Frame: For valuable or delicate needlepoint or framing cross stitch, a professional framer offering conservation services is often the best way to frame needlepoint for longevity.
What To Expect
- Consultation: You’ll talk about your piece, its size, the fabric, and where you want to display it.
- Material Choices: You’ll pick frames, mats, and glass types. Ask about acid-free options and UV-protective glass for the best protection.
- Cost: Custom framing embroidery costs more than DIY, but you pay for expertise and preservation. Get a clear price quote.
- Process: They will take your piece, prepare it, mount it using techniques like lacing embroidery board, add the mat and frame, and give it back ready to hang.
Professional framing ensures your art is displayed beautifully and protected for years to come.
What You Need: Essential Materials
No matter if you are framing cross stitch, matting needlepoint, or doing any DIY embroidery framing, having the right supplies makes the job easier and helps protect your work.
- Acid-Free Mounting Board: This is a firm board that your embroidery is attached to. “Acid-free” means it won’t release chemicals that can yellow or break down fabric over time. Look for phrases like “acid-free foam core” or “conservation board.”
- Acid-Free Mat Board: If you use a mat, it must also be acid-free for the same reasons. Mats provide space between your fabric and the glass, which is important for textile art. Acid-free matting is a must for preservation.
- Frame: Choose a frame that fits your piece and style. Make sure it is deep enough to hold the mounting board, embroidery, mat (if used), glass, and backing board.
- Glass: Standard picture frame glass is fine for simple display, but for better protection, especially for valuable pieces, consider glass with UV protection. This helps stop colors from fading in sunlight.
- Backing Board: This goes behind your mounted embroidery and mat inside the frame. It should also ideally be acid-free.
- Hinging Tape: Use acid-free gummed paper tape or linen tape to attach your mat to the mounting board. Only use this kind of tape; regular tapes can yellow and damage things over time.
- Mounting Thread/Pins: For stretching embroidery for framing onto a board, use strong, non-stretchy thread (like linen or quilting thread) for lacing. If pinning, use stainless steel pins which won’t rust.
- Tools: Scissors, ruler, pencil, needle, possibly a craft knife or mat cutter if cutting your own board/mat. Gloves are good to keep your fabric clean.
Using acid-free framing materials is a core part of protecting your textile art. Think of it as an investment in keeping your hard work beautiful for decades.
Care for Framed Embroidery
Once your embroidery is framed, a little care goes a long way in keeping it looking new.
- Where to hang it: Don’t hang framed embroidery in direct sunlight. Sun is a major cause of fading. Avoid damp places like bathrooms, which can encourage mold or mildew. Steady room temperature and average humidity are best.
- Clean the glass: Dust the frame and glass regularly with a soft cloth. If the glass needs cleaning, spray the cleaner onto your cloth first, not directly onto the glass. This stops liquid from seeping into the frame and possibly damaging your piece.
- Check it over time: Every few years, take a close look at your framed piece. Is the fabric still taut? Are the colors still bright? If you see any issues, especially with older pieces, you might consider professional conservation framing textile art services to refresh or better protect it.
- Avoid touching the fabric: Once framed, try not to touch the fabric itself. Oils from fingers can leave marks.
Proper framing, especially using acid-free materials and techniques like lacing embroidery board, combined with good care, means your framed embroidery will be a joy to see for many years.
Picking the Right Method
Deciding the best way to frame needlepoint or framing cross stitch depends on a few things:
- Size of the piece: Small pieces might be easy for DIY. Large, heavy pieces might need professional help.
- Value: Is it a simple practice piece or a major heirloom? More valuable pieces benefit most from conservation framing textile art.
- Fabric type: Some fabrics stretch differently. A professional knows how to handle various textiles.
- Your skill level: Are you comfortable stretching and lacing fabric tightly and evenly? DIY embroidery framing takes practice.
- Budget: DIY is cheaper, but custom framing embroidery offers greater long-term protection and a perfect finish.
- Desired look: Do you want it in a hoop? With a wide mat? Close to the frame? This can guide your choice.
| Framing Method | Pros | Cons | Best For | DIY or Pro? |
|---|---|---|---|---|
| Mounting on Board (DIY) | Flat, professional look; Good fabric support | Requires careful stretching/lacing skill | Most flat needlework, cross stitch, samplers | DIY |
| Framing in Hoop (DIY) | Simple, quick, modern look | Fabric less protected; Can loosen over time | Small, simple pieces; When the hoop is part of the design | DIY |
| Using Mat (DIY) | Classic look; Protects fabric from glass | Requires mat cutting or buying; Needs mounting | Pieces needing space around them; Adding design element | DIY |
| Custom Framing (Pro) | Best protection (conservation); Perfect finish | More expensive; Less control over the process | Valuable, large, complex, or delicate pieces; Long-term preservation | Pro |
Consider these points when deciding how to turn your lovely stitching into wall art.
Frequently Asked Questions (FAQ)
h5. What is acid-free framing and why is it important?
Acid-free framing uses materials like mats, boards, and tapes that do not contain acids or chemicals that can harm your artwork over time. Regular paper and cardboard can release acids that cause fabric to yellow, become brittle, and break down. Using acid-free framing materials is essential for preserving your embroidery, especially if you want it to last for many years without damage.
h5. Can I use spray adhesive or double-sided tape to mount my embroidery?
While it might seem easy, using spray adhesive or regular double-sided tape for stretching embroidery for framing is generally not recommended. These adhesives can be difficult or impossible to remove later without damaging the fabric. They can also yellow over time or become brittle, causing the fabric to detach. The lacing embroidery board method is preferred because it is fully reversible and doesn’t put sticky chemicals on your fabric.
h5. How do I keep my embroidery from touching the glass?
Using a mat (matting needlepoint or cross stitch) is the best way to create space between your embroidery and the glass. The mat board acts as a spacer. For pieces too thick for a standard mat or for framed hoop embroidery, a professional framer can use spacers built into the frame to achieve the same separation. This gap is important because fabric touching glass can lead to moisture buildup, mold, or the fabric sticking to the glass over time.
h5. Is conservation framing really necessary?
Conservation framing textile art is highly recommended for pieces that are old, valuable, delicate, or hold significant personal meaning. It uses specialized, reversible techniques and the highest quality acid-free framing materials to protect your piece from environmental damage (light, humidity, dust, pests) and material breakdown. While not necessary for every small, simple piece, it’s the best way to ensure important needlework lasts for future generations.
h5. Can I frame embroidery in a floating frame?
Yes, you can frame embroidery in a floating frame, but it requires specific mounting. The embroidery is typically mounted onto a rigid board (acid-free, of course) that is smaller than the frame. The board is then attached to a backing board or the frame itself, creating the illusion that the embroidery is floating within the frame space. This method often requires the edges of your fabric to be finished neatly or hidden behind the mounted piece itself. This is a form of custom framing embroidery that can create a striking display.
Conclusion
Framing your embroidery is the perfect final touch for your creative work. Whether you choose DIY embroidery framing methods like stretching embroidery for framing onto a board or framing hoop embroidery, or opt for professional custom framing embroidery for the utmost care and conservation framing textile art, the goal is to protect and display your beautiful stitches. By using acid-free framing materials and proper techniques like lacing embroidery board and acid-free matting, you ensure that your framing cross stitch or matting needlepoint piece remains vibrant and intact for years. Pick the method that suits your project and skill level, and enjoy seeing your needlework transformed into cherished wall art.