
Threading the bobbin on your Kenmore sewing machine is a key step before you can start sewing. It’s the process of getting the bottom thread ready for your machine to use. Knowing how to fill a Kenmore bobbin and then put it in correctly is very important for good stitches. This guide will walk you through these simple steps for your Kenmore sewing machine.
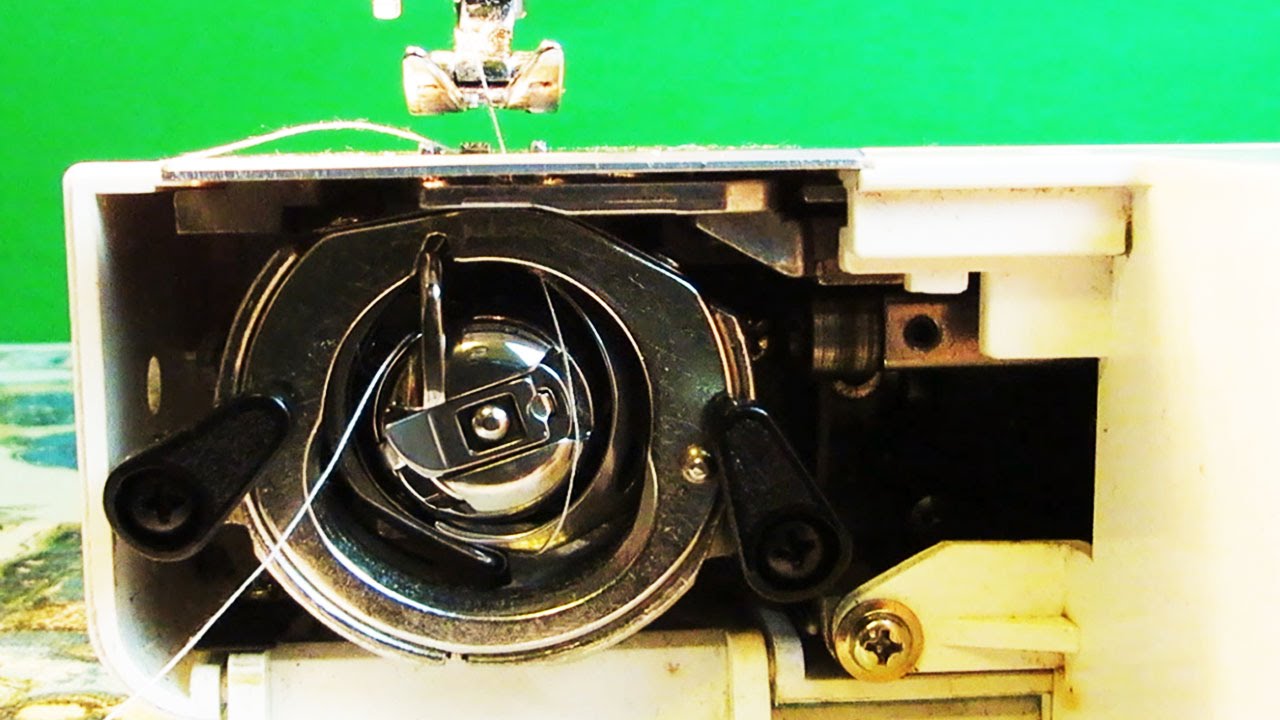
Image Source: i.ytimg.com
Getting Ready to Thread the Bobbin
Before you start winding or inserting your bobbin, you need a few things. Getting ready makes the process much easier and faster. It helps you avoid simple mistakes.
Gathering Your Supplies
What do you need to have ready? Not much! Just a few items.
- Your Kenmore Sewing Machine: Make sure it’s plugged in and the power is on.
- Thread: Pick the thread color you want to use. It should match the top thread for best results, or be a contrasting color if you want that look.
- An Empty Bobbin: You need a bobbin that fits your specific Kenmore model. We will talk more about this soon. It should be empty so you can wind fresh thread onto it.
- Small Scissors or Thread Snips: You will need these to cut the thread at the right times.
- Your Machine Manual (Optional but Recommended): Your Kenmore machine manual has pictures and steps just for your model. Old Kenmore bobbin threading can sometimes differ slightly from newer models. Checking the manual is always a good idea.
Finding the Right Bobbin
This is a very important step. Kenmore sewing machines, like other brands, need a specific type of bobbin. Using the wrong bobbin can cause Kenmore bobbin problems. It can make your thread jam. It can break your needle. It can mess up your stitches.
There are different types of bobbins. Some are made of metal. Some are made of plastic. They also come in slightly different sizes and shapes.
- Check Your Manual: The best way to know is to look in your Kenmore sewing machine manual. It will tell you the exact bobbin type needed.
- Look at Your Old Bobbin: If you have bobbins that came with your machine, look at them closely. Buy new bobbins that look exactly the same. Do not guess.
- Metal vs. Plastic: Some machines use only metal bobbins. Others use only plastic. Some very old Kenmore bobbin threading systems might only work with specific metal types. Do not mix them up. Putting a metal bobbin in a machine meant for plastic, or vice versa, will likely cause problems.
Using the right bobbin is the first step to successful Kenmore bobbin winding and sewing.
Learning How to Fill Your Kenmore Bobbin
Filling the bobbin with thread is called winding the bobbin. Your Kenmore machine has a special part just for this job. This part is called the Kenmore bobbin winder. The process of winding thread Kenmore bobbin is quite simple once you know where everything is and what to do.
Locating the Kenmore Bobbin Winder
Where is the Kenmore bobbin winder on your machine? It’s usually easy to find.
- Common Spots: On many Kenmore models, the bobbin winder is on the top of the machine. It might be on the right side. On some older models, it could be near the handwheel.
- What It Looks Like: The Kenmore bobbin winder usually has a spindle (a small post) where the empty bobbin sits. There might also be a guide or a tension disc nearby that the thread goes through first. It often has a lever or a part that slides.
Look at your machine carefully or check your manual if you can’t find it right away.
Setting Up for Winding Thread Kenmore Bobbin
Now that you’ve found the winder, let’s get the thread ready.
- Put the Spool on the Spool Pin: Place the spool of thread you want to wind onto the spool pin. This pin is usually on the top of your machine. Make sure the thread comes off the spool smoothly.
- Guide the Thread to the Winder: Your machine has a path for the thread to follow to get to the bobbin winder.
- Find the first thread guide. It might be a metal loop or hook.
- Look for a special tension disc meant for bobbin winding. This disc makes sure the thread winds onto the bobbin tightly and evenly. Pull the thread through this tension disc. It puts a little pull on the thread. This pull is important for a well-wound bobbin.
- Follow the path to the bobbin winder area.
- Put the Empty Bobbin on the Spindle: Place your empty bobbin onto the Kenmore bobbin winder spindle. Push it down gently but firmly. It might click into place.
Starting the Kenmore Bobbin Winding Process
Now you are ready to fill Kenmore bobbin with thread.
- Hold the Thread End: Take the end of the thread coming from the tension disc and the winder path. Thread it through one of the small holes on the top of the empty bobbin. If your bobbin doesn’t have holes on top, just wrap the thread around the center post a few times.
- Engage the Winder: Slide the entire bobbin winder mechanism over, or push the lever next to the bobbin. You will feel or hear it click into the “winding” position. This locks the bobbin spindle in place and connects it to the motor.
- Disengage the Needle (Very Important!): You don’t want the needle to move while you are winding the bobbin. This can be dangerous and put stress on the machine.
- Look at the handwheel on the side of your machine (the big wheel you can turn by hand).
- On most Kenmore machines, you can pull the center part of the handwheel out towards you. This disconnects the needle from the motor. The handwheel will still turn, but the needle bar will not go up and down when you press the foot pedal.
- Check your manual if you are not sure how to do this on your model. For some very old models, you might need to loosen a screw on the handwheel instead of pulling.
- Start Winding: Hold the tail of the thread coming out of the bobbin for the first few turns. This keeps the thread from getting tangled.
- Gently press the foot pedal (or turn the speed control if your machine has one).
- The bobbin will start to spin very fast, winding the thread onto it.
- Once a little thread has wound on, you can stop holding the tail and snip it off close to the bobbin.
- Watch It Wind: Let the bobbin continue to fill. The Kenmore bobbin winder usually has a guide that helps the thread wind evenly back and forth across the bobbin. If the thread is piling up only in the center or only on one side, check that the thread is correctly through the bobbin winding tension disc.
- Stop When Full: Do not overfill the bobbin. Fill it until it is just slightly less than full. Most Kenmore bobbin winders have a small lever or guide that will pop out or stop the winding automatically when the bobbin is full. If yours doesn’t, just watch it and stop when the thread is close to the edge of the bobbin. An overfilled bobbin can cause Kenmore bobbin problems when sewing.
- Finish Up:
- Release the foot pedal.
- Slide the bobbin winder mechanism back to its original position (disengaged).
- Cut the thread connecting the full bobbin to the spool.
- Remove the full bobbin from the spindle.
- Push the center of the handwheel back in to re-engage the needle mechanism.
You have now successfully wound a Kenmore bobbin!
Preparing to Insert Bobbin Kenmore
Now that you have a nicely wound bobbin, the next step is to put it into the machine. Where the bobbin goes depends on the type of bobbin system your Kenmore machine has. Kenmore machines use one of two main types: top-loading or front-loading.
Identifying Your Bobbin Type
How do you know if your machine is top-loading or front-loading?
- Top-Loading: These machines have a clear cover plate (often plastic) on the flat bed of the machine, right under where the needle sews. You slide this plate open or remove it to access the bobbin. The bobbin drops directly into a spot here.
- Front-Loading: These machines have a door or cover on the front of the machine, below the needle area. The bobbin is housed inside a metal case called the bobbin case Kenmore. You open the door, take out the bobbin case, put the bobbin in the case, and then put the case back into the machine. Old Kenmore bobbin threading systems are often front-loading.
Look at your machine. Where do you see a possible place for the bobbin? That tells you which type you have.
Finding the Bobbin Compartment
- Top-Loading: The compartment is right under the sewing area. Look for a sliding cover.
- Front-Loading: The compartment is behind a door on the front or side of the free arm, under the needle.
Knowing where the bobbin goes is key for loading bobbin Kenmore into the machine correctly.
Putting the Bobbin into a Top-Loading Kenmore Machine
If your Kenmore machine is a top-loader, follow these steps to insert bobbin Kenmore. This is generally considered the easier system for loading.
Opening the Bobbin Area
- Make sure your needle is in the highest position. You can turn the handwheel towards you to lift it all the way up.
- Find the bobbin cover plate on the bed of the machine. It might be clear or solid.
- Slide the plate open or lift it off completely. Set it aside carefully. You will see a space where the bobbin sits flat.
Placing the Bobbin Correctly
This step is crucial for smooth sewing and avoiding Kenmore bobbin problems. The bobbin must be placed so the thread comes off in the right direction.
- Which Way Does it Spin? Look at the area where the bobbin sits. There should be a diagram or illustration showing which way the thread should come off the bobbin. It will show either clockwise or counter-clockwise rotation.
- Insert the Bobbin: Drop the wound bobbin into the bobbin area. Make sure it sits flat.
- Check the Direction: Gently pull the thread end. Is it coming off the bobbin in the direction shown in the diagram? If not, lift the bobbin out, flip it over, and put it back in. Test again. The thread must come off in the correct direction for the machine to pick it up properly.
Guiding the Thread
Once the bobbin is in place, you need to guide the thread through a specific path.
- Find the notch or guide slot next to where the bobbin sits. It’s designed to put the correct tension on the bobbin thread.
- Pull the thread end from the bobbin and slide it into this notch or slot. It might click into place. Follow the path indicated by arrows or diagrams. The thread usually goes through a slot and then maybe under a small bar.
- Leave a tail of thread about 4-6 inches long coming out from the guide path.
Checking Bobbin Movement
Just a quick check to make sure it’s sitting right.
- With the cover plate still open, gently turn the handwheel towards you.
- Watch the bobbin. It should spin freely as the needle goes down and comes back up. The thread should feed smoothly from the guide path.
Closing the Area
- Take the bobbin cover plate.
- Slide it back into place or lower it back down until it is fully closed and flush with the machine bed.
You have now successfully loaded bobbin Kenmore into a top-loading machine!
Putting the Bobbin into a Front-Loading Kenmore Machine
If your Kenmore machine is a front-loader, you will use the bobbin case Kenmore. This system involves a few extra steps compared to top-loading, but it’s just as easy once you know how. Old Kenmore bobbin threading systems almost always use this method.
Removing the Bobbin Case Kenmore
- Make sure the needle is in the highest position. Turn the handwheel towards you.
- Find the door or cover on the front of your machine, usually near the base of the free arm. Open it.
- You will see a metal part inside. This is the bobbin case Kenmore. It has a small latch or handle.
- Gently pull on the latch or handle to release the bobbin case. Carefully slide or pull the bobbin case out of the machine. It might feel a little loose when you pull the latch.
Loading Bobbin Kenmore into the Case
Now you put the wound bobbin into the bobbin case Kenmore.
- Hold the empty bobbin case in one hand. It’s a round metal case.
- Hold your full bobbin in the other hand.
- Look at the bobbin case. It has a slot or opening on the side, and a tension spring.
- Insert the bobbin into the case. Which way should the thread come off?
- For most front-loading bobbin cases (including many old Kenmore bobbin threading types), you want the thread to come off the bobbin so that it spins clockwise when you pull it.
- Place the bobbin into the case.
- Pull the thread end into the slot on the edge of the case.
- Pull the thread firmly along the edge of the case and under the tension spring. It should slide smoothly under the spring. There might be a little click as it goes under.
- Leave a thread tail about 4-6 inches long hanging from the bobbin case.
Checking Bobbin Tension
The tension spring on the bobbin case Kenmore is very important. It controls how much pull is on the bobbin thread. This affects your stitch quality.
- Hold the bobbin case by the thread tail you just pulled through the tension spring.
- The bobbin case should hang from the thread without dropping quickly.
- If you give a little tug, the bobbin should slowly unwind as the case drops a little. It shouldn’t just fall freely.
- If it falls freely, the tension is too loose. If you pull hard and it doesn’t budge, the tension is too tight.
- Bobbin case tension problems can cause loops on the bottom of your fabric (if too loose) or broken thread (if too tight). There is usually a small screw on the bobbin case to adjust tension, but it’s best not to touch this unless you are sure it’s needed and know how. For most people, just making sure the thread is correctly under the tension spring is enough.
Inserting the Bobbin Case Kenmore Back In
You have the bobbin in the case, and the thread is through the tension spring. Now put the case back into the machine.
- Hold the bobbin case by its open latch or handle. This keeps the bobbin from falling out as you insert it.
- Slide the bobbin case back into the round opening in the machine. There is usually a small notch or keyway inside the machine that the bobbin case fits onto. This keeps the case from spinning.
- Push the bobbin case firmly until it clicks into place. The latch should spring back and hold it securely. Do not force it. If it doesn’t go in easily, take it out and try again, making sure the notch is lined up.
- Once the case is locked in, gently close the front cover door of the machine.
You have now finished loading bobbin Kenmore into a front-loading machine!
Bringing Up the Bobbin Thread
Whether you have a top-loading or front-loading Kenmore, you need to bring the bobbin thread up through the needle plate hole so it can connect with the top thread. This is a quick and easy step.
Setting Up
- Make sure your machine is threaded with the top thread, and that the top thread is guided under the presser foot.
- Make sure the presser foot is lifted up. This releases the tension on the top thread.
The Process
- Hold the end of the top thread lightly with your left hand. Hold it off to the side, not pulling hard, but just keeping a little bit of slack.
- Slowly turn the handwheel on the side of your machine towards you. Always turn the handwheel towards you. Turning it the other way can mess up the machine’s timing.
- As you turn the handwheel, the needle will go down into the bobbin area. It will loop around the bobbin or bobbin case. It catches the bobbin thread.
- Keep turning the handwheel slowly towards you. The needle will come back up out of the needle plate hole. As it comes up, it will bring a loop of the bobbin thread with it.
- Stop turning the handwheel when the needle is at its highest point again.
- You will see a small loop of the bobbin thread (the bottom thread) sitting on top of the needle plate. It might be next to the needle.
- Take a pair of scissors, a pin, or your finger and gently pull that loop of bobbin thread up fully. Pull the loop until the end of the bobbin thread comes through the hole.
- You should now have both the top thread and the bobbin thread pulled up through the needle plate.
- Gently pull both the top thread and the bobbin thread towards the back of the machine, under the presser foot, and behind the needle. Leave thread tails about 4-6 inches long there.
Your Kenmore sewing machine is now fully threaded and ready to sew!
Tips for Smooth Bobbin Threading Kenmore
Getting the bobbin right is important for trouble-free sewing. Here are some extra tips.
Using Quality Kenmore Sewing Machine Thread
The thread itself matters!
- Good Thread: Use good quality thread that is meant for sewing machines. Cheap thread can be weak, fuzzy, or have uneven thickness. This causes Kenmore bobbin problems and top thread problems. It can break easily or leave lint in your machine.
- Matching Thread: Use thread of the same type and weight for both the top and bobbin. Using different types can mess up your tension.
- Fresh Thread: Old thread can become weak and break easily. If you have thread that’s been sitting around for many years, it might be time to get new spools.
Regular Cleaning
Lint and dust build up in sewing machines, especially in the bobbin area. This lint can cause a lot of Kenmore bobbin problems, like thread jams, skipped stitches, and uneven tension.
- Clean Often: Every few projects, or after sewing fuzzy fabric, take out the bobbin (and the bobbin case if you have a front-loader). Use a small brush (your machine might have come with one) to brush away lint from the bobbin area and the bobbin case Kenmore.
- No Canned Air: Do not use canned air meant for cleaning computers. While it blows away lint, it can also blow it deeper into your machine where it’s harder to remove and can cause bigger problems. Brushing is better.
Checking Your Machine Manual
Every Kenmore model is a little different.
- Specific Steps: Your manual shows the exact thread path for Kenmore bobbin winding. It shows how to insert bobbin Kenmore correctly for your specific model. It tells you how to disengage the handwheel. Old Kenmore bobbin threading instructions might look different from newer ones.
- Troubleshooting: The manual also has troubleshooting tips for common Kenmore bobbin problems. Keep your manual handy!
Watching the Tension
Correct tension makes your stitches look good. The bobbin tension works together with the top thread tension.
- If you have problems with your stitches (like loops on the bottom of the fabric), it could be a bobbin issue (thread not seated right in the bobbin case Kenmore tension), or it could be your top tension needs adjustment.
- Make sure the bobbin thread is always pulled through its tension guide correctly.
Troubleshooting Common Kenmore Bobbin Problems
Even when you follow the steps, sometimes things go wrong. Here are some common Kenmore bobbin problems and what to do.
Thread Jamming or Breaking
This is frustrating! The thread might be tangled in the bobbin area or keep snapping.
- Cause:
- The bobbin was wound unevenly during Kenmore bobbin winding (winding thread Kenmore bobbin incorrectly). The thread is piled up on one side.
- You are using the wrong type or size of bobbin for your machine.
- The bobbin was inserted incorrectly (insert bobbin Kenmore wrong way). The thread is coming off the bobbin in the wrong direction.
- The bobbin case Kenmore is full of lint.
- The thread is not through the tension guide in the bobbin area or on the bobbin case.
- The thread is old or poor quality.
- Fixes:
- Take the bobbin out. Unwind it or wind a new bobbin, making sure it fills evenly.
- Check your manual and make sure you are using the correct bobbin type.
- Take the bobbin out and re-insert bobbin Kenmore, making sure the thread comes off in the correct direction (check diagram).
- Clean the bobbin area and the bobbin case Kenmore carefully using a brush.
- Make sure the thread is properly seated in the tension guide.
- Try using a different spool of fresh, quality thread.
Uneven Stitches (Looping on Bottom)
If your stitches look messy on the bottom of your fabric, with loose loops, this is a classic sign of a problem related to thread tension.
- Cause:
- The most common cause is actually that the top thread tension is too loose.
- However, it can also be because the bobbin thread is not coming out of the bobbin case Kenmore or bobbin area with enough tension. This usually means the thread is not correctly through the tension spring/guide.
- Lint or debris is stuck in the bobbin case tension spring.
- Fixes:
- First, check your top thread. Is it threaded correctly through all the guides, including the tension discs and the take-up lever? Re-thread the top if needed.
- Adjust the top tension dial to a higher number. Sew a test stitch on a scrap of fabric to see if it improves.
- Take out the bobbin (and bobbin case). Re-insert bobbin Kenmore, making sure the thread snaps correctly into the tension guide or under the tension spring on the bobbin case Kenmore. Pull the thread to feel the tension.
- Clean the bobbin area and the bobbin case Kenmore, paying special attention to the tension spring slot.
Bobbin Not Winding Properly
The bobbin winder is not filling the bobbin, or the thread is winding unevenly.
- Cause:
- The thread is not following the correct path to the Kenmore bobbin winder, especially not going through the bobbin winding tension disc.
- The Kenmore bobbin winder is not fully engaged (not slid over or clicked into place).
- You forgot to disengage the needle mechanism (pull out the handwheel). The motor power is going to the needle instead of the winder.
- The bobbin spindle is bent or damaged.
- Fixes:
- Carefully check the thread path from the spool pin to the bobbin winder. Make sure it goes through all required guides and tension discs.
- Ensure the Kenmore bobbin winder is pushed fully into the winding position.
- Pull out the center of the handwheel (or follow your manual’s steps to disengage the needle).
- If the spindle looks damaged, you might need a repair.
These are just a few common issues. If you have major Kenmore bobbin problems that you can’t fix, it might be time to take your machine to a repair shop.
Keeping Your Bobbin System Healthy
A little care goes a long way in preventing Kenmore bobbin problems.
Cleaning the Bobbin Area
This is the most important maintenance for the bobbin system.
- How to Clean:
- Turn off your machine.
- Remove the needle and presser foot for safety.
- Open the bobbin compartment (remove slide plate or bobbin case Kenmore).
- Use the small brush that came with your machine (or a similar soft brush) to brush away all visible lint and fuzz. Pay attention to the bob bobbin case Kenmore area, the feed dogs (the teeth under the needle plate), and any tension springs you can access.
- Do this regularly!
Oiling (If Your Model Requires It)
Some Kenmore machines need oiling in certain spots to run smoothly. The bobbin area is sometimes one of these spots.
- Check Your Manual: Your Kenmore sewing machine manual will show diagrams of where to put a drop of sewing machine oil. Do not use other types of oil.
- Follow Instructions: Only oil where the manual tells you, and only use the recommended amount. Over-oiling attracts lint.
- Many modern machines are “self-lubricating” in the bobbin area and do not require oiling there. Check your specific model’s manual!
Mastering Old Kenmore Bobbin Threading
Vintage Kenmore sewing machines are built to last, but they might have slightly different features than new ones. Old Kenmore bobbin threading often involves a front-loading bobbin case.
Vintage Machine Considerations
- Bobbin Type: Older machines are very specific about bobbins. Many use metal bobbins only. Using plastic could damage the machine or simply not work. Always use the bobbin type that came with the machine or is listed in its original manual.
- Winder Design: The Kenmore bobbin winder might look a little different. It might be metal and require a specific way to engage it or disengage the handwheel.
- Front Load Common: Many old Kenmore models are front-loading. Mastering how to load the bobbin into the bobbin case Kenmore and insert the case correctly is key for these machines.
Importance of the Original Manual
For old Kenmore bobbin threading, finding the original manual is incredibly helpful.
- It will show the exact path for winding thread Kenmore bobbin.
- It will show the precise way to insert bobbin Kenmore into the case and the machine.
- It will show how to disengage the handwheel for winding.
- It often has model-specific troubleshooting for Kenmore bobbin problems.
If you don’t have the manual, you can often find scanned copies online by searching for your machine’s model number.
Next Steps After Threading
You’ve successfully threaded the top thread, wound and inserted your Kenmore bobbin, and brought the bobbin thread up. What’s next?
Closing Up the Machine
- Make sure the bobbin cover plate (top loader) or front door (front loader) is properly closed.
Doing a Test Stitch
Before you start your project, sew a few lines of stitches on a scrap piece of the same fabric you plan to use.
- Use the same thread.
- Check both the top and bottom stitches. They should look even and balanced, like two threads meeting perfectly in the middle of the fabric layers.
- If the stitches don’t look right, go back to the troubleshooting section. It might be a tension issue.
Starting Your Project
If the test stitch looks good, you are ready to sew!
Conclusion
Threading a bobbin in your Kenmore sewing machine, whether it’s the Kenmore bobbin winding process, inserting the bobbin Kenmore, or dealing with the bobbin case Kenmore, is a basic skill every sewer needs. It might seem tricky at first, especially learning where everything goes for winding thread Kenmore bobbin or loading bobbin Kenmore the right way.
But by following these simple steps, using the right bobbin, keeping your machine clean, and checking your manual when needed, you can avoid most Kenmore bobbin problems. With a little practice, filling and threading the bobbin will become quick and easy. You’ll be ready to start your sewing projects smoothly.
Frequently Asked Questions (FAQ)
Q: Can I use any bobbin in my Kenmore sewing machine?
No, you cannot use any bobbin. Kenmore machines need a specific type of bobbin, either metal or plastic, and a specific size and shape. Using the wrong bobbin can cause problems. Always use the type recommended in your manual or the type that came with your machine.
Q: Why won’t my Kenmore bobbin winding work?
Check a few things: Is the thread correctly guided to the Kenmore bobbin winder, especially through the small tension disc? Is the bobbin winder fully engaged (slid over or clicked)? Did you disengage the needle mechanism (pull out the handwheel)? The motor’s power might still be going to the needle instead of the winder.
Q: How do I know if the bobbin is inserted correctly in my Kenmore?
For a top-loading Kenmore, the thread must come off the bobbin in the direction shown by the diagram near the bobbin area (usually clockwise or counter-clockwise). For a front-loading machine using a bobbin case Kenmore, the thread usually comes off the bobbin so it spins clockwise when you pull the thread from the case. The thread must also be correctly pulled through the tension guide (top load) or under the tension spring (front load bobbin case).
Q: Why is my bottom stitch looping on my fabric?
Loose loops on the bottom are usually caused by incorrect tension. Most often, the top thread tension is too loose, not the bobbin tension. Re-thread your top thread completely, making sure it is correctly seated in the tension discs and take-up lever. If that doesn’t fix it, check that the bobbin thread is correctly through its tension guide/spring.
Q: My Kenmore machine is old, are the bobbin steps different?
Old Kenmore bobbin threading might be slightly different, especially regarding the type of bobbin used (often metal) and how the bobbin winder or handwheel disengagement works. Many old models are front-loading and use a bobbin case Kenmore. The best way to know for sure is to consult the original machine manual for your specific model.