
Image Source: mindymakes.com
How To Use Brother Sewing Machine For Beginners Step by Step
Learning to use a sewing machine can feel like a big step, but it’s also very exciting! Brother sewing machines are popular because they are often easy to learn on. If you are new to sewing, this guide will walk you through how to use your Brother sewing machine from the very beginning. We will cover everything you need to know to get started, including how to set up your machine for the first time, how to wind the bobbin, how to thread the machine, put the bobbin in, pick the right needle, understand basic stitches, adjust thread tightness, learn about different feet, and practice sewing straight lines.
Getting Ready to Sew
When you get a new Brother sewing machine, the first step is setting it up. This is your first time sewing machine setup. Take it out of the box carefully. Find a good spot to work. You need a table or desk that is strong and has enough room. Make sure you have light so you can see what you are doing.
Look at your sewing machine. Get out the power cord. Find where it plugs into the machine. Plug the other end into the wall. Find the foot pedal. This pedal makes the machine sew when you push it. Plug the foot pedal into the machine too.
Now, look at the machine parts. It helps to know the names of things. This is like looking at a Brother sewing machine parts diagram. Even without a picture, you can find the main parts.
Locating Main Machine Parts
Let’s find the important parts on your Brother sewing machine.
- Needle: This is the sharp part that goes up and down to make stitches. It holds the thread.
- Presser Foot: This foot holds your fabric flat against the machine while you sew. We will talk about different kinds of presser foot types later.
- Needle Plate: This is the metal plate right under the needle and presser foot. It often has lines on it to help you sew straight.
- Bobbin Cover: This is a clear or metal cover. It is on the needle plate area. The bobbin goes underneath it.
- Bobbin Winder: This is a small pin or area usually on the top right of the machine. You use it to wind thread onto a bobbin.
- Thread Spool Pin: This pin holds the spool of thread you use for the top thread. It is usually on the top of the machine.
- Thread Guides: These are hooks or clips the thread goes through on its way to the needle. They help guide the thread.
- Tension Dial: This dial controls how tight the thread is. This is for sewing machine tension adjustment. It is usually on the front or side of the machine.
- Stitch Selector: This lets you choose what kind of stitch you want to sew (like a straight stitch or zigzag). It might be a dial or buttons.
- Reverse Lever or Button: This makes the machine sew backward. It helps lock stitches at the start and end.
- Handwheel: This is a large wheel on the side of the machine. You can turn it with your hand to move the needle up and down slowly. Always turn it towards you.
Spend a little time looking at these parts on your machine. Touch them. See where they are. This helps you get used to your machine.
Getting Thread Ready
Before you can sew, you need thread. You need thread for the top and thread for the bottom. The thread for the bottom goes on a small spool called a bobbin.
Winding the Bobbin
Winding a bobbin is one of the first things you need to do. This is winding a bobbin on Brother machine. It is simple once you know how.
- Get a bobbin that came with your machine or is right for your machine. Brother machines use specific bobbin types. Check your manual if you are not sure.
- Get your spool of thread. Put the spool on the spool pin on top of your machine. Make sure the thread comes off the spool the right way. Usually, it comes off from the back or side, depending on how the spool sits. Your machine manual will show you.
- Take the end of the thread. Most Brother machines have a path for winding the bobbin. Look for a picture or numbers on your machine near the bobbin winder area.
- Put the end of the thread into a small hole on the empty bobbin.
- Put the bobbin onto the bobbin winder pin. Push the bobbin winder pin to the side. This makes the machine motor know you want to wind the bobbin, not sew.
- Hold the end of the thread sticking out of the bobbin’s hole.
- Step gently on the foot pedal. The bobbin will spin and wind thread onto it.
- Let go of the thread end after it winds a few times. The bobbin will keep winding.
- Watch the bobbin fill up. Do not fill it past the edge.
- When it is full, take your foot off the pedal.
- Push the bobbin winder pin back to its sewing position.
- Cut the thread connecting the bobbin to the spool.
Now you have a full bobbin for the bottom thread.
Putting the Bobbin in the Machine
Now that you have a wound bobbin, you need to put it into the machine. This is putting bobbin in Brother sewing machine. The steps are a little different depending on if your machine has a front-load bobbin or a top-load bobbin. Most newer Brother machines have top-load bobbins.
Top-Load Bobbin (Drop-in Bobbin)
This is the most common type on newer machines.
- Make sure the needle is up. You can use the handwheel to lift it.
- Open the bobbin cover on the needle plate. It usually slides off or flips open.
- Take your wound bobbin. Look at how the thread is coming off the bobbin. There is a specific direction it needs to turn. On most Brother top-load machines, the thread should come off the left side, making the bobbin look like it will turn counter-clockwise as the thread pulls. Check the diagram near the bobbin area on your machine.
- Drop the bobbin into the bobbin case area.
- Pull the thread tail into the small slot or guide channel around the bobbin area. Follow the arrows or numbers shown on the machine. This guides the thread properly into the tension spring for the bobbin.
- Leave a thread tail about 4-6 inches long.
- Close the bobbin cover.
Front-Load Bobbin
Older or some model Brother machines have a bobbin case that goes into a slot at the front of the machine, often behind a door.
- Open the door on the front of your machine.
- You will see a metal bobbin case. Take it out.
- Open the bobbin case. It might have a small latch.
- Put your wound bobbin into the bobbin case. The thread needs to come off the bobbin in a specific direction. Look for a diagram on the bobbin case or in your manual.
- Guide the thread into the slot or opening on the bobbin case. This puts the thread under tension.
- Close the bobbin case and snap it shut (if it has a snap).
- Put the bobbin case back into the machine’s bobbin area. Make sure it clicks or seats correctly.
- Leave a thread tail sticking out.
- Close the front door.
Now the bottom thread is ready!
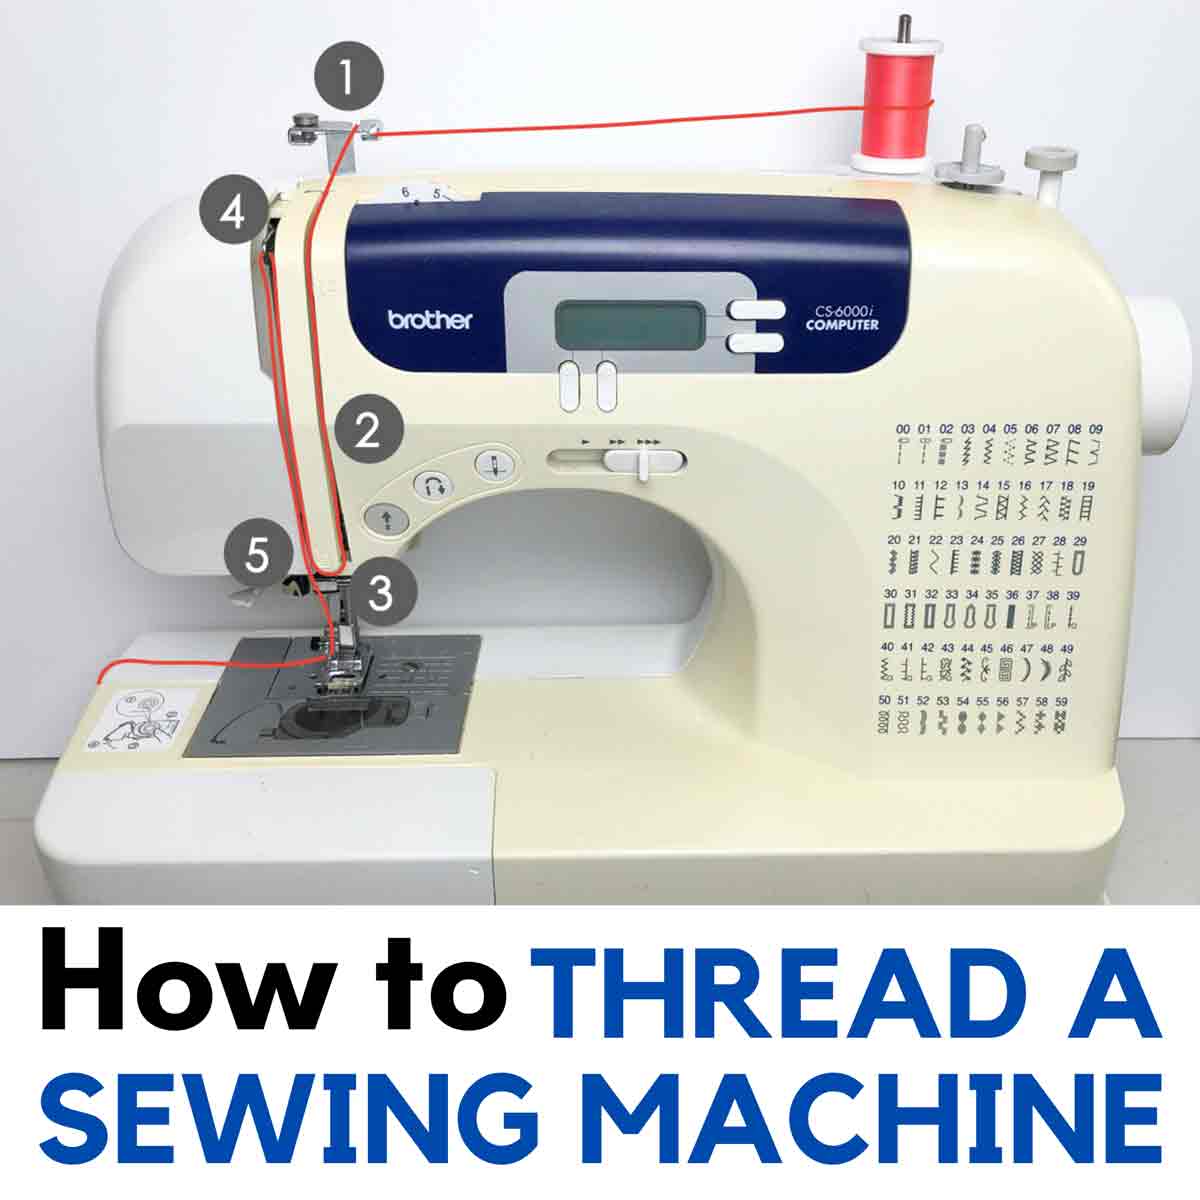
Threading the Top
With the bobbin in place, you need to thread the top part of the machine. This is threading a Brother sewing machine. It is like following a numbered path. Most machines have numbers or diagrams printed on them to show you the way.
- Put your spool of thread on the spool pin on top of the machine. Make sure the thread comes off the right way.
- Follow the first guide on your machine. This might be a hook or clip near the spool pin.
- Pull the thread down the main channel on the front of the machine. You will usually go all the way down.
- At the bottom of the channel, the thread usually turns and goes up the second channel.
- Here you will find the take-up lever. This is a metal piece that moves up and down as the machine sews. It is important the thread goes through or around this lever. Make sure the take-up lever is in its highest position. You can turn the handwheel towards you to lift it.
- Hook the thread through the take-up lever. There might be a hole or slot.
- Bring the thread back down the channel towards the needle.
- Guide the thread through any remaining guides near the needle. There might be one or two.
- Now, thread the needle. The thread goes through the eye of the needle. On most home machines, you thread from front to back. Some newer machines have an automatic needle threader. If yours does, follow its instructions! It saves time and makes threading easier.
- Pull the thread tail through the needle eye about 4-6 inches.
Now both the top and bottom threads are ready. You just need to bring the bobbin thread up.
Bringing Up the Bobbin Thread
Before you can sew, you need the bobbin thread to come up through the needle plate.
- Hold the end of the top thread lightly with your left hand.
- Turn the handwheel towards you slowly.
- Watch the needle go down and come back up. As it comes up, it will catch the bobbin thread.
- Look for a loop of bobbin thread appearing on the needle plate.
- Use tweezers or your fingers to pull this loop up.
- Pull the bobbin thread tail completely through the needle plate hole.
- You now have two thread tails (top and bobbin) coming from under the presser foot.
- Pull both thread tails under the presser foot and towards the back of the machine. This keeps them out of the way when you start sewing.
You are almost ready to sew!
Setting Up for Sewing
You have thread in your machine. Now you need to set up the stitch and get the fabric ready.
Selecting Your Stitch
Your Brother machine can make different stitches. These are basic sewing machine stitches. For beginners, the most important stitches are:
- Straight Stitch: This is the stitch you use for most sewing. It makes a line of straight stitches. You can often change the length of the stitch (how long each stitch is). A longer stitch is good for basting (temporary stitches), and a shorter stitch is good for strong seams.
- Zigzag Stitch: This stitch goes back and forth in a V shape. It is good for finishing edges of fabric so they do not fray (unravel). You can change both the width (how wide the V is) and the length (how close together the Vs are).
Your machine will have a way to choose the stitch. It might be a dial with pictures or numbers, or buttons with stitch names. Start with a straight stitch. Set the stitch length. A good starting length is often around 2.5.
Choosing the Right Foot
The presser foot holds your fabric. Your machine came with one or more presser feet. The most common one is the standard or zigzag foot. It has an opening wide enough for both straight and zigzag stitches. There are many different presser foot types for different jobs:
- Standard/Zigzag Foot: Good for most sewing with straight or zigzag stitches.
- Zipper Foot: Lets you sew close to a zipper.
- Buttonhole Foot: Helps you make buttonholes.
- Blind Hem Foot: Helps you sew hems that are almost invisible on the outside.
For now, just use the standard presser foot. It is good for learning straight stitches. The presser foot lifts up and down. There is a lever on the back of the machine, usually above the needle area, that lifts and lowers the foot. You must lower the presser foot before you sew!
Picking the Right Needle
Just like thread, you need the right needle for your fabric. This is choosing sewing machine needle. Needles have different sizes and types.
- Sizes: Needles have numbers like 70/10, 80/12, 90/14, 100/16. Smaller numbers are for lighter fabrics (like cotton lawn or silk). Bigger numbers are for heavier fabrics (like denim or canvas). An 80/12 or 90/14 needle is a good general size for medium cotton fabrics, which are good for practicing.
- Types: Needles are made for different fabrics.
- Universal needles work for many woven and knit fabrics. Good for beginners.
- Ballpoint needles are for knit fabrics (like t-shirts). They have a rounded tip that pushes fabric fibers apart instead of piercing them.
- Denim needles are stronger for thick fabrics.
- Microtex needles are very sharp for fine fabrics or synthetics.
Start with a new universal needle in size 80/12 or 90/14. A dull or bent needle can cause problems like skipped stitches or broken threads. Change your needle often, perhaps after every project or every 8-10 hours of sewing.
Checking Thread Tension
Sewing machine tension adjustment controls how the top thread and bobbin thread pull together to form a stitch. When the tension is right, the stitches look the same on the top and bottom of the fabric. The knot where the two threads meet should be hidden inside the fabric layers.
- Too Tight: If the top tension is too tight, the bobbin thread will show as straight line on the top of the fabric. If the bobbin tension is too tight (less common to adjust), the top thread will show as a straight line on the bottom.
- Too Loose: If the top tension is too loose, the top thread will show as loops on the bottom of the fabric. If the bobbin tension is too loose, loops will show on the top.
Your machine has a tension dial, usually numbered. For most stitches on medium cotton fabric, a setting between 3 and 5 is common.
How to check tension:
1. Get two scraps of the fabric you plan to sew.
2. Set your machine to a straight stitch, medium length (around 2.5).
3. Lower the presser foot onto the fabric.
4. Sew a line of stitches (about 3-4 inches long).
5. Pull the threads to the side and cut them.
6. Look at the stitches on the top and bottom of the fabric.
7. If the stitches look good on both sides, your tension is likely correct.
8. If the top thread is pulling to the bottom (loops on bottom), the top tension is too loose. Turn the tension dial to a higher number.
9. If the bobbin thread is pulling to the top (straight line on top), the top tension is too tight. Turn the tension dial to a lower number.
Sew test lines after changing the tension dial. Keep doing this until the stitches look balanced. Write down the setting that works for that fabric and thread.
Taking Your First Stitches
You are threaded, the bobbin is in, you picked a stitch, foot, and needle, and checked tension. It is time to sew! But do not start on your project yet. It is best to practice sewing lines.
Practicing on Scraps
Get some scrap fabric. Cotton is a good fabric to start with. It does not stretch much and is easy to handle.
- Sit at your machine. Place a piece of scrap fabric under the presser foot.
- Lower the presser foot using the lever. Remember, you must lower the foot to sew! If the foot is up, the thread will make a tangled mess (a bird’s nest) on the bottom.
- Hold the two thread tails (top and bobbin) behind the presser foot for the first few stitches. This helps stop the thread from pulling back into the machine.
- Gently push down on the foot pedal. The machine will start to sew.
- Keep your eyes on the fabric and the guidelines on the needle plate. Try to feed the fabric so the needle sews a straight line.
- Do not push or pull the fabric hard. The machine feeds the fabric by itself using the feed dogs (the little teeth under the presser foot). Your job is just to guide the fabric direction.
- Sew a few inches.
- To stop, take your foot off the pedal.
- Lift the presser foot lever.
- Gently pull the fabric away from the machine and cut the threads. Your machine might have a thread cutter on the side.
Sew many lines on your scrap fabric. Try to sew straight lines. Try sewing along the edge of the fabric. Try turning a corner (stop with the needle down in the fabric, lift the presser foot, turn the fabric, lower the presser foot, and keep sewing).
More Practice Ideas
- Draw lines on fabric with a washable marker and practice sewing exactly on the lines.
- Practice sewing curves.
- Practice starting and stopping smoothly.
- Practice sewing in reverse at the start and end of a line (push the reverse lever or button for a few stitches) to lock your stitches.
Keep practicing until you feel comfortable controlling the fabric and the machine speed.
Simple First Projects
Once you feel a little more comfortable sewing straight lines, you might want to try a very simple project. This helps you use your new skills.
Here are some ideas for a first project:
- Simple Potholder: Sew two squares of fabric right sides together with a layer of batting inside. Leave a gap. Turn it right side out. Sew the gap closed. Sew lines through it to hold the batting.
- Easy Pillowcase: Sew fabric pieces together using straight stitches. French seams are a good way to make neat insides without fraying.
- Simple Tote Bag: Sew two rectangles together for the bag body and add fabric strips for handles.
Pick something easy with mostly straight lines. Do not worry if it is not perfect. Every stitch you sew helps you learn more.
Keeping Your Machine Running
To keep your Brother sewing machine working well, you need to do a little care.
- Clean It: Lint and dust from fabric can build up. Use a small brush (often came with your machine) to clean around the bobbin area and the feed dogs. Unplug the machine first!
- Change Needles: As mentioned before, change your needle often. A fresh needle makes a big difference.
- Cover It: When you are not using your machine, put the cover on it to keep dust out.
- Refer to Your Manual: Your manual has specific cleaning and oiling instructions for your model. Follow them.
Taking care of your machine helps it last longer and sew better for you.
Frequently Asked Questions (FAQ)
Here are some common questions beginners ask about using a Brother sewing machine.
- Why is my thread breaking?
Thread can break for several reasons. The needle might be bent or dull. The thread might be old or poor quality. The top tension might be too tight. The machine might not be threaded correctly, especially the top thread path or the bobbin winding. Make sure the presser foot is down when you sew. - Why are my stitches looping on the bottom of the fabric?
This is usually caused by the top thread tension being too loose. Increase the number on your tension dial. Also, double-check that you threaded the top of the machine correctly, making sure the thread is seated properly in the tension discs and goes through the take-up lever. - Why is my machine making a tangled mess (bird’s nest)?
The most common reason for a tangled mess, especially underneath the fabric, is forgetting to lower the presser foot before you start sewing. Always lower the foot! Also, make sure the machine is threaded correctly and the bobbin is put in the right way. Holding the thread tails behind the foot for the first few stitches can also help prevent this. - What kind of thread should I use?
For most beginner projects and general sewing, a good quality all-purpose polyester thread is recommended. It is strong and works well on many different fabrics. Avoid very cheap thread, as it can cause lint buildup and thread breakage. - How do I know which way the bobbin thread should go in?
For top-loading bobbins (the ones you drop in from the top), there is usually a diagram right on the machine near the bobbin area showing which direction the thread should unwind (usually counter-clockwise). For front-loading bobbins (the ones that go into a separate case), there is often a diagram on the bobbin case or in your machine’s manual. It is important to get this right for proper tension. - My machine is not sewing, what should I do?
First, check the simple things. Is the machine plugged in? Is the power switch on? Is the foot pedal plugged in? Is the bobbin winder pushed to the sewing position? Is the presser foot down? Is the machine threaded correctly? Check these basics before thinking there is a big problem.
Learning to sew takes practice. Be patient with yourself. Start simple, take your time, and do not be afraid to try again if a stitch or a project does not turn out perfectly the first time. Soon, you will be sewing all sorts of wonderful things with your Brother machine!