
What is a bobbin and why is it important? A bobbin is a small spool that holds the lower thread of your sewing machine. This lower thread works with the upper thread, guided through the needle, to create stitches. Properly winding and inserting the bobbin is crucial for smooth sewing and preventing thread jams or skipped stitches. This guide will walk you through the entire process of Singer bobbin winding and insertion.
Sewing machines are wonderful tools for creativity and practicality. Whether you’re a beginner just starting your sewing journey or an experienced crafter looking for a refresher, mastering the fundamentals is key. One of the most vital steps in preparing your Singer sewing machine to sew is correctly threading the bobbin and then properly placing it in the machine. This article will provide a comprehensive, step-by-step guide to ensure you can confidently wind bobbin Singer machines and get to your sewing projects without frustration.
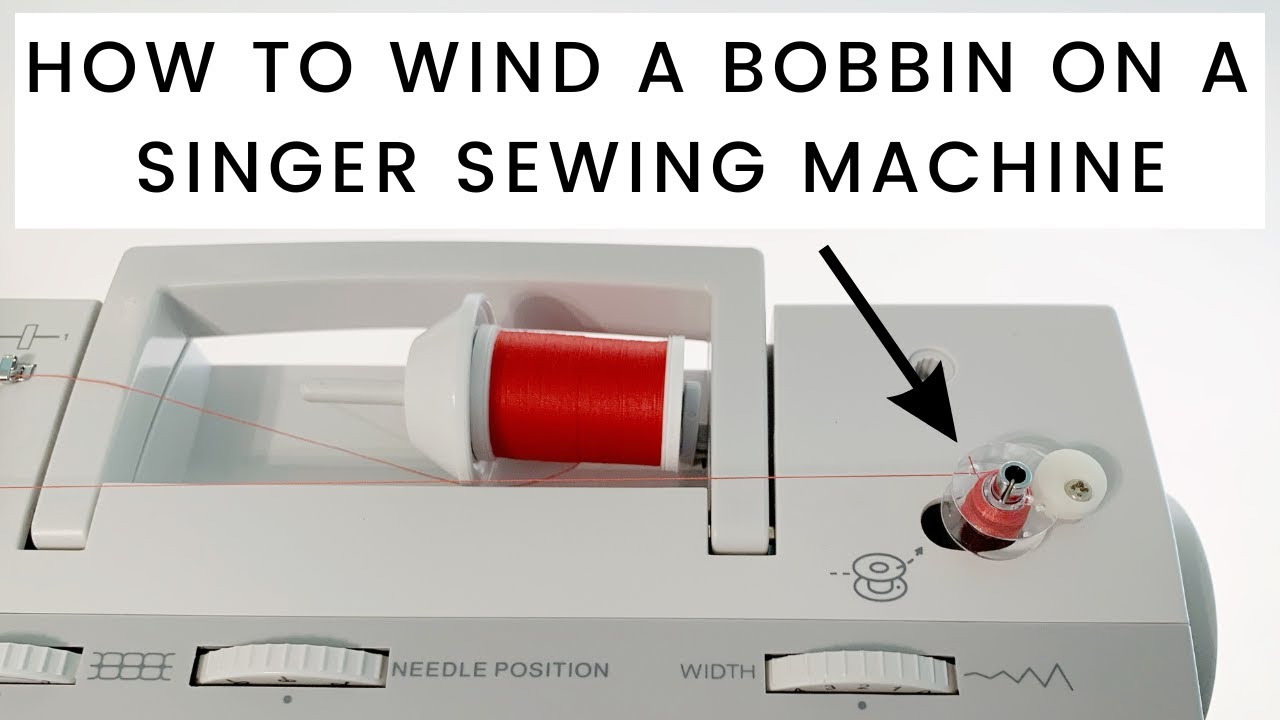
Image Source: i.ytimg.com
Preparing to Wind Your Bobbin
Before you begin the actual process of Singer bobbin winding, there are a few essential steps to take to ensure a smooth and successful operation. Gathering your supplies and setting up your machine correctly will prevent common issues and make the entire experience more enjoyable.
Gather Your Supplies
You’ll need a few things readily available:
- Your Singer Sewing Machine: Ensure it’s plugged in and the power is on if it has an electric motor.
- A Bobbin: Use a bobbin that is specifically designed for your Singer model. Using the wrong type of bobbin can cause stitching problems. Check your machine’s manual if you’re unsure.
- Thread: Select the thread color and type you intend to use for your project. Ensure the thread is not tangled or frayed at the starting end.
- Scissors or a Thread Cutter: For snipping the thread.
- Your Singer Sewing Machine Manual: This is your best friend for model-specific details, especially regarding the bobbin case Singer or type of bobbin holder.
Locate Key Components
Familiarize yourself with the parts of your Singer sewing machine that are involved in bobbin winding:
- Bobbin Winder Spindle: This is a small rod or peg, usually located on the top or side of your sewing machine, where you place the bobbin to be wound.
- Bobbin Winder Tension Disc: This is a small metal assembly, often with two discs, that the thread passes through to create tension on the sewing machine bobbin thread as it winds. This is crucial for winding bobbin correctly.
- Bobbin Winder Stop/Engaging Mechanism: This is a lever or a movable part that engages the bobbin winder mechanism when you need to wind a bobbin and disengages the needle bar.
- Needle Bar: The part that holds the needle. When winding the bobbin, the needle bar should be stationary.
- Presser Foot: While not directly involved in winding, ensure it is in its normal up position.
Step-by-Step Guide to Winding a Singer Bobbin
Now, let’s get down to the process of wind bobbin Singer. Follow these steps carefully for a perfectly wound bobbin.
Step 1: Place the Bobbin on the Winder Spindle
- Locate the bobbin winder spindle on your Singer machine. It’s usually a horizontal peg.
- Slide a clean, empty bobbin onto the spindle. The bobbin should fit snugly.
- Ensure the side of the bobbin with the hole (where you’ll insert the thread end) is facing the correct direction according to your machine’s design. Most Singer machines have the hole facing towards the thread guide.
Step 2: Thread the Bobbin Winder
This is a critical step for ensuring even tension and preventing thread tangles.
- Bring the Thread from the Spool: Place your spool of thread on the main spool pin.
- Guide the Thread Through the Thread Guide: Many Singer machines have a small thread guide near the spool pin for the bobbin winder. Guide the thread through this.
- Pass Through the Bobbin Winder Tension Discs: This is where tension is applied.
- Locate the bobbin winder tension discs.
- Take the end of the thread and bring it up and between the two tension discs. Think of it like threading a very small eye of a needle.
- Pull the thread so it comes out the other side. The thread should be seated in the groove of the tension discs.
- Continue to the Bobbin:
- After passing through the tension discs, guide the thread towards the bobbin.
- Take the end of the thread and insert it through the hole in the side of the bobbin. Push about 3-4 inches (7-10 cm) of thread through the hole.
- Secure the Thread End:
- Hold the thread end firmly against the bobbin.
- You can often wrap the thread end around a small notch or hook on the bobbin to keep it in place.
Step 3: Engage the Bobbin Winder Mechanism
This step shifts the machine’s operation from sewing to bobbin winding.
- Disengage the Needle: Most Singer machines have a way to disengage the needle bar from the main drive mechanism. This is usually done by pushing the handwheel inward or outward. Consult your manual if you are unsure how to do this for your specific model. The goal is to have the handwheel spin freely without the needle moving up and down.
- Engage the Bobbin Winder: There will be a mechanism to move the bobbin winder spindle into position. This might be a small lever that you push, or you might slide the entire spindle assembly towards the bobbin. Once engaged, the bobbin winder will spin when you press the foot pedal.
Step 4: Start Winding the Bobbin
Now you’re ready to actually wind bobbin Singer!
- Initial Wind: Hold the thread end securely. Gently press the foot pedal. The bobbin will start to spin. Allow it to wind a few turns, ensuring the thread is wrapping around the bobbin and the thread you pushed through the hole.
- Trim the Excess Thread: Once a few turns are made and the thread is securely wound, carefully trim the excess thread end close to the bobbin using your scissors. This prevents it from getting caught later.
- Continue Winding: Continue pressing the foot pedal. The bobbin will fill with thread.
- Even Winding: Try to guide the thread gently back and forth across the bobbin as it winds. This helps ensure even distribution of thread and promotes winding bobbin correctly. Some machines have an automatic thread guide that moves back and forth; if yours does, ensure it’s functioning.
- Tension Check: You should feel a slight resistance from the tension discs. If the thread feels too loose or too tight, you may need to adjust the position of the thread within the tension discs or check if they are clean.
- Automatic Stop: Most Singer bobbin winders have an automatic stop feature. When the bobbin is full, it will usually push against a small mechanism that stops the winding. If your machine doesn’t have an automatic stop, watch the bobbin and stop winding when it’s full. Avoid overfilling, as this can cause problems.
Step 5: Disengage the Bobbin Winder and Remove the Bobbin
Once the bobbin is wound:
- Disengage the Bobbin Winder: Reverse the action you took in Step 3 to disengage the bobbin winder mechanism. Slide the spindle back to its original position.
- Re-engage the Needle: If you pushed your handwheel in to disengage the needle bar, pull it back out. Your needle should now be able to move up and down again.
- Remove the Bobbin: Carefully slide the wound bobbin off the bobbin winder spindle.
Congratulations! You have successfully completed Singer bobbin winding.
Inserting the Bobbin into Your Singer Sewing Machine
Now that you have a perfectly wound bobbin, the next crucial step is to correctly insert bobbin Singer. This process differs slightly depending on whether your Singer machine has a front-loading or top-loading bobbin system.
For Top-Loading Bobbin Systems (Drop-In Bobbin)
Many modern Singer sewing machines feature a convenient drop-in bobbin system. This is generally considered easier for beginners.
- Identify the Bobbin Area: Lift the presser foot. Remove any accessory tray or needle plate if necessary to access the bobbin case area. You’ll see a clear plastic cover over the bobbin shuttle.
- Remove the Bobbin Cover: Lift off the clear plastic cover.
- Insert the Bobbin:
- Take your wound bobbin and place it into the bobbin shuttle.
- Direction of Thread: This is critical for how to load bobbin. The thread must unwind in the correct direction. For most Singer drop-in systems, the bobbin should be placed so that the thread unwinds counter-clockwise. Look for a diagram on your machine or in your manual, or a small arrow etched on the bobbin shuttle cover.
- Thread Path: There will be a small slot or groove in the bobbin shuttle. Guide the thread into this slot and pull it under the tension spring.
- Bring the Bobbin Thread Up:
- Hold the end of the upper thread with one hand.
- With your other hand, slowly turn the handwheel towards you (counter-clockwise). This will bring the needle down and then back up, catching the bobbin thread and pulling it up through the needle plate.
- You will see a small loop of bobbin thread emerge.
- Position the Threads:
- Pull the loop of bobbin thread gently towards the back of the machine, under the presser foot and behind the needle.
- You should now have both the upper thread and the bobbin thread extending from the needle plate area.
- Place the bobbin thread ends together behind the presser foot.
- Replace the Bobbin Cover: Snap the clear plastic bobbin cover back into place.
You are now ready to sew with your top-loading Singer machine!
For Front-Loading Bobbin Systems (Bobbin Case System)
Older and some basic Singer models use a removable bobbin case Singer. This system involves a separate bobbin case that fits into a shuttle.
- Access the Bobbin Area: Lift the presser foot. Remove the needle plate (this usually slides or lifts off). You will see a metal bobbin shuttle that the bobbin case fits into.
- Remove the Old Bobbin Case (if applicable): If there’s already a bobbin case in the machine, gently pull it out.
- Prepare the Bobbin Case with the New Bobbin:
- Take your wound bobbin and place it into the bobbin case Singer.
- Direction of Thread: For most Singer front-loading systems, the bobbin should be placed so the thread unwinds clockwise. Again, check your machine’s manual or any etched diagrams for the correct direction.
- Thread Path: Locate the small slot or notch in the bobbin case. Guide the thread into this slot and pull it through to the little tension spring. There should be a small cut or slit where the thread sits.
- Pull about 3-4 inches (7-10 cm) of thread through the bobbin case.
- Insert the Bobbin Case into the Shuttle:
- Hold the bobbin case Singer with the thread coming over the top.
- Align the bobbin case with the shuttle in the machine. There will be a small hook or latch on the shuttle that needs to catch the bobbin case.
- Gently push the bobbin case into the shuttle until it clicks or feels securely in place. The thread should be held firmly.
- Bring the Bobbin Thread Up:
- Hold the end of the upper thread with one hand.
- With your other hand, slowly turn the handwheel towards you (counter-clockwise).
- The needle will go down and then back up, catching the bobbin thread.
- Position the Threads:
- Pull the loop of bobbin thread gently towards the back of the machine, under where the needle plate was.
- You should have both the upper thread and the bobbin thread extending from the needle plate area.
- Place the bobbin thread ends together behind the presser foot.
- Replace the Needle Plate: Slide or snap the needle plate back into its original position.
Your Singer machine is now ready to sew using the front-loading bobbin system.
Ensuring Proper Bobbin Tension
Bobbin tension Singer machines is as important as the tension for the upper thread. If the bobbin tension is too loose or too tight, your stitches will look uneven, and you might experience skipped stitches or thread breakage.
What is Bobbin Tension?
Bobbin tension refers to the resistance the bobbin thread encounters as it is pulled through the bobbin case and the shuttle mechanism. This tension is typically controlled by a small spring within the bobbin case or the shuttle assembly.
How to Check Bobbin Tension
A simple way to check bobbin tension is the “drop test.”
- With the bobbin threaded and in its case (or shuttle for drop-in systems), let about 3-4 inches of thread hang free.
- Hold the bobbin case by the thread and let it hang.
- Give the bobbin case a gentle flick with your finger.
- Ideal Tension: The bobbin case should drop a little bit and then stop, with the thread barely moving.
- Too Loose: If the bobbin case drops significantly and the thread unwinds freely, the tension is too loose.
- Too Tight: If the bobbin case doesn’t drop at all or moves very little, the tension is too tight.
Adjusting Bobbin Tension
- For Bobbin Case Systems: You’ll usually see a small screw on the bobbin case itself.
- To tighten: Turn the screw slightly clockwise.
- To loosen: Turn the screw slightly counter-clockwise.
- Make very small adjustments – a quarter turn at a time – and re-test.
- For Drop-In Systems: The tension adjustment is typically built into the bobbin shuttle. Some machines have a small screw accessible when the bobbin is out. Others might have a different mechanism. Again, consult your Singer manual.
Important Note: Most of the time, the bobbin tension is set correctly at the factory and does not need frequent adjustment. The most common cause of tension issues is incorrect threading of the bobbin case or shuttle, or the upper thread tension being off. Before adjusting bobbin tension, always double-check that the upper thread is tensioned correctly and that the bobbin is threaded properly.
Frequently Asked Questions About Singer Bobbin Winding
Here are some common questions about threading and using Singer bobbins.
Q1: My Singer sewing machine isn’t winding the bobbin evenly. What should I do?
A: Ensure you are guiding the thread back and forth across the bobbin as it winds. If your machine has an automatic thread guide for the bobbin winder, make sure it’s functioning correctly. Also, check that the thread is seated properly in the bobbin winder tension discs.
Q2: The sewing machine bobbin thread is breaking while winding. Why?
A: This could be due to several reasons: the thread is old or damaged, the bobbin winder tension discs are dirty, or the bobbin is not placed correctly on the spindle. Ensure you’re using good quality thread and that the thread path is clear and clean.
Q3: How do I know if I have the correct bobbin for my Singer machine?
A: Singer machines use specific types and sizes of bobbins. Using the wrong bobbin can lead to poor stitch quality or machine damage. Check your Singer sewing machine manual for the exact bobbin type and number required. You can often find this information on the machine itself or on the original packaging. Many common Singer machines use style 15 bobbins, but it’s crucial to verify.
Q4: What is the purpose of the Singer bobbin holder?
A: The term “Singer bobbin holder” can refer to a few things. It most commonly refers to the bobbin itself, which holds the thread. In the context of a front-loading system, it can also refer to the removable bobbin case that the bobbin sits inside. The bobbin case helps guide the thread and provides the tension for the lower stitch.
Q5: Can I use a different brand of bobbin thread in my Singer?
A: Yes, you can generally use quality thread from other brands as long as it is the correct weight and type for your machine. However, always ensure the thread is smooth, strong, and free of knots or slubs.
Q6: My stitches look messy, with loops on the underside. What might be wrong?
A: This usually indicates a problem with the upper thread tension or incorrect threading of the bobbin. Double-check that the upper thread is properly seated in all the tension discs and that the bobbin is inserted correctly, with the thread unwinding in the right direction. Ensure the bobbin thread is properly guided through the tension spring of the bobbin case.
Q7: How do I know if I need to adjust the bobbin tension Singer?
A: If your stitches consistently have loops on the fabric surface (meaning the bobbin thread is too loose) or if the bobbin thread is causing the upper thread to break or pull through to the top (meaning the bobbin tension is too tight), then you may need to adjust it. Always start by checking upper thread tension and correct bobbin threading first.
By following these detailed steps, you’ll be able to confidently wind and insert the bobbin on your Singer sewing machine, setting yourself up for successful and enjoyable sewing projects. Happy stitching!